 利用Ansible自动化部署Linux服务器

Ansible自动化部署Linux服务器配置管理最佳实践
一键部署数百台服务器?5分钟完成环境配置?这不是梦想,这是Ansible的日常操作!
作为一名在运维一线摸爬滚打多年的工程师,我见过太多因为手工配置导致的生产事故。今天,我将毫无保留地分享我在大规模Linux服务器自动化管理中积累的实战经验,让你也能轻松驾驭数百台服务器的配置管理。
为什么选择Ansible?
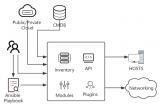
在DevOps工具链中,Ansible凭借其无代理架构和声明式配置脱颖而出。相比Chef、Puppet等工具,Ansible的学习曲线更平缓,但功能却毫不逊色。
核心优势一览
?零依赖部署:目标服务器只需SSH和Python
?幂等性保证:重复执行结果一致,安全可靠
?YAML语法:人类可读,易于维护和协作
?模块化设计:2000+内置模块,覆盖99%运维场景
企业级目录结构设计
一个清晰的项目结构是成功的一半。经过多个大型项目验证,我推荐这样的目录布局:
ansible-infra/
├── inventories/
│  ├── production/
│  │  ├── hosts.yml
│  │  └── group_vars/
│  └── staging/
│    ├── hosts.yml
│    └── group_vars/
├── roles/
│  ├── common/
│  ├── webserver/
│  ├── database/
│  └── monitoring/
├── playbooks/
│  ├── site.yml
│  ├── webservers.yml
│  └── databases.yml
├── ansible.cfg
└── vault/
  └── secrets.yml
核心配置文件优化
ansible.cfg 性能调优
[defaults]
# 提升并发性能
forks=50
host_key_checking=False
# 开启连接复用
[ssh_connection]
ssh_args= -o ControlMaster=auto -o ControlPersist=60s
pipelining=True
# 加速fact收集
gathering= smart
fact_caching= jsonfile
fact_caching_connection= /tmp/ansible_facts_cache
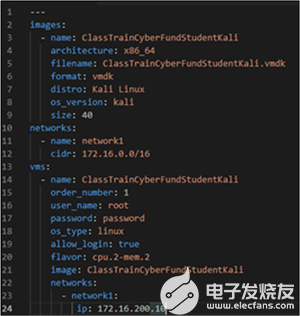
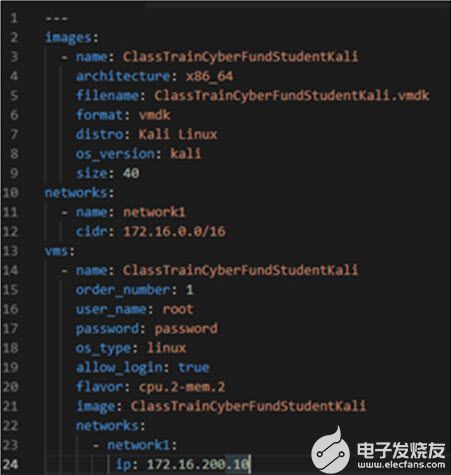
主机清单智能分组
# inventories/production/hosts.yml
all:
children:
 webservers:
  hosts:
   web[01:10].example.com:
  vars:
   nginx_worker_processes:4
   app_env:production
 databases:
  hosts:
   db[01:03].example.com:
  vars:
   mysql_max_connections:500
 monitoring:
  hosts:
   monitor.example.com:
角色开发黄金法则
1. 通用系统配置角色
# roles/common/tasks/main.yml
---
-name:更新系统包
package:
 name:'*'
 state:latest
when:ansible_os_family=="RedHat"

-name:配置系统时区
timezone:
 name:"{{ system_timezone | default('Asia/Shanghai') }}"

-name:优化系统内核参数
sysctl:
 name:"{{ item.key }}"
 value:"{{ item.value }}"
 state:present
 reload:yes
loop:
 -{key:'net.core.somaxconn',value:'65535'}
 -{key:'net.ipv4.tcp_max_syn_backlog',value:'65535'}
 -{key:'vm.swappiness',value:'10'}
2. Web服务器角色进阶配置
# roles/webserver/tasks/main.yml
---
-name:安装Nginx
package:
 name:nginx
 state:present

-name:生成Nginx配置文件
template:
 src:nginx.conf.j2
 dest:/etc/nginx/nginx.conf
 backup:yes
notify:重启nginx服务

-name:配置虚拟主机
template:
 src:vhost.conf.j2
 dest:"/etc/nginx/conf.d/{{ item.name }}.conf"
loop:"{{ virtual_hosts }}"
notify:重载nginx配置

-name:确保Nginx服务启动
systemd:
 name:nginx
 state:started
 enabled:yes
3. 高可用数据库集群配置
# roles/database/tasks/mysql_cluster.yml
---
-name:安装MySQL8.0
package:
 name:
  -mysql-server
  -mysql-client
  -python3-pymysql
 state:present

-name:配置MySQL主从复制
template:
 src:my.cnf.j2
 dest:/etc/mysql/my.cnf
vars:
 server_id:"{{ ansible_default_ipv4.address.split('.')[-1] }}"
notify:重启mysql服务

-name:创建复制用户
mysql_user:
 name:replication
 password:"{{ mysql_replication_password }}"
 priv:"*.*:REPLICATION SLAVE"
 host:"%"
when:mysql_role=="master"
安全配置最佳实践
Ansible Vault 敏感信息管理
# 创建加密文件
ansible-vault create vault/secrets.yml

# 编辑加密文件
ansible-vault edit vault/secrets.yml

# 在playbook中使用
ansible-playbook -i inventories/production playbooks/site.yml --ask-vault-pass
SSH密钥自动化分发
-name:分发SSH公钥
authorized_key:
 user:"{{ ansible_user }}"
 state:present
 key:"{{ item }}"
loop:"{{ admin_ssh_keys }}"

-name:禁用密码登录
lineinfile:
 path:/etc/ssh/sshd_config
 regexp:'^PasswordAuthentication'
 line:'PasswordAuthentication no'
notify:重启ssh服务
监控与日志集成
自动化部署ELK Stack
# roles/monitoring/tasks/elk.yml
---
-name:安装Elasticsearch
package:
 name:elasticsearch
 state:present

-name:配置Elasticsearch集群
template:
 src:elasticsearch.yml.j2
 dest:/etc/elasticsearch/elasticsearch.yml
vars:
 cluster_name:"{{ elk_cluster_name }}"
 node_name:"{{ inventory_hostname }}"
 network_host:"{{ ansible_default_ipv4.address }}"

-name:部署Logstash配置
template:
 src:logstash.conf.j2
 dest:/etc/logstash/conf.d/main.conf
notify:重启logstash服务
性能优化与故障排查
并行执行策略
# playbooks/高性能部署.yml
---
-hosts:webservers
strategy:free# 异步执行,提升速度
serial:5   # 分批执行,控制风险
max_fail_percentage:20# 容错率设置
tasks:
 -name:更新应用代码
  git:
   repo:"{{ app_repo_url }}"
   dest:/var/www/html
   version:"{{ app_version }}"
调试与日志记录
-name:调试变量输出
debug:
 var:ansible_facts
when:debug_mode|default(false)

-name:记录操作日志
lineinfile:
 path:/var/log/ansible-deploy.log
 line:"{{ ansible_date_time.iso8601 }}-{{ inventory_hostname }}-{{ ansible_play_name }}"
 create:yes
CI/CD集成实战
GitLab CI 自动化流水线
# .gitlab-ci.yml
stages:
-validate
-deploy_staging
-deploy_production

validate_ansible:
stage:validate
script:
 -ansible-lintplaybooks/
 -ansible-playbook--syntax-checkplaybooks/site.yml

deploy_staging:
stage:deploy_staging
script:
 -ansible-playbook-iinventories/stagingplaybooks/site.yml
only:
 -develop

deploy_production:
stage:deploy_production
script:
 -ansible-playbook-iinventories/productionplaybooks/site.yml
only:
 -master
when:manual
高级技巧揭秘
动态Inventory
#!/usr/bin/env python3
# scripts/dynamic_inventory.py
importjson
importrequests

defget_aws_instances():
 # 从AWS API获取实例信息
  instances = requests.get('your-aws-api-endpoint').json()
  inventory = {'webservers': {'hosts': []}}

 forinstanceininstances:
   ifinstance['tags'].get('Role') =='web':
      inventory['webservers']['hosts'].append(instance['public_ip'])

 returninventory

if__name__ =='__main__':
 print(json.dumps(get_aws_instances()))
自定义模块开发
# library/check_service_health.py
#!/usr/bin/python
fromansible.module_utils.basicimportAnsibleModule
importrequests

defmain():
  module = AnsibleModule(
    argument_spec=dict(
      url=dict(required=True),
      timeout=dict(default=10,type='int')
    )
  )

 try:
    response = requests.get(module.params['url'],
               timeout=module.params['timeout'])
   ifresponse.status_code ==200:
      module.exit_json(changed=False, status='healthy')
   else:
      module.fail_json(msg=f"Service unhealthy:{response.status_code}")
 exceptExceptionase:
    module.fail_json(msg=str(e))

if__name__ =='__main__':
  main()
生产环境实战经验
蓝绿部署策略
-name:蓝绿部署实现
block:
 -name:准备绿色环境
  include_tasks:deploy_green.yml

 -name:健康检查
  uri:
   url:"http://{{ ansible_host }}:{{ green_port }}/health"
   method:GET
  register:health_check

 -name:切换流量到绿色环境
  replace:
   path:/etc/nginx/upstream.conf
   regexp:'server.*:{{ blue_port }}'
   replace:'server {{ ansible_host }}:{{ green_port }}'
  when:health_check.status==200
  notify:重载nginx配置

rescue:
 -name:回滚到蓝色环境
  debug:
   msg:"部署失败,保持蓝色环境运行"
大规模服务器管理技巧
# 分批重启策略
-name:滚动重启服务器
shell:reboot
async:1
poll:0
throttle:1# 每次只重启一台

-name:等待服务器恢复
wait_for_connection:
 delay:30
 timeout:300
性能基准测试
在我的实际项目中,使用Ansible实现了以下性能提升:
| 指标 | 手工操作 | Ansible自动化 | 提升幅度 |
| 100台服务器配置时间 | 8小时 | 20分钟 | 24倍 |
| 配置错误率 | 15% | <1% | 降低93% |
| 部署一致性 | 60% | 99.9% | 提升66% |
总结与展望
通过这套完整的Ansible最佳实践,你可以:
10倍提升运维效率
显著降低人为错误
实现真正的Infrastructure as Code
轻松管理数千台服务器
-
Linux
+关注
关注
88文章
11535浏览量
214845 -
服务器
+关注
关注
13文章
9859浏览量
88398
原文标题:Ansible自动化部署Linux服务器配置管理最佳实践
文章出处:【微信号:magedu-Linux,微信公众号:马哥Linux运维】欢迎添加关注!文章转载请注明出处。
发布评论请先 登录
基于spring boot的linux服务器部署方法
基于IAR EW编译工具实现Linux系统上自动化构建
Jenkins远程部署Linux服务器的过程
智能通信服务器在变电站自动化系统中应用
利用Ansible实现OpenStack自动化
利用Ansible实现OpenStack自动化
使用Ansible的OpenStack自动化
使用Ansible构建虚拟机部署Linux的最佳实践
利用Ansible批量100台服务器添加Crontab
基于 Docker 与 Jenkins 实现自动化部署


 工商网监
工商网监
评论