 Ansible Playbook自动化部署Nginx集群指南

DDoS防御实战:Ansible Playbook自动化部署Nginx集群完整指南
运维老司机说:面对日益猖獗的DDoS攻击,手动部署防护已经out了!今天教你用Ansible一键部署具备DDoS防御能力的Nginx集群,让攻击者哭着回家!
为什么这套方案能让你的运维效率提升300%?
传统运维痛点你中了几个?
? 手动部署Nginx,一台服务器搞半天
? DDoS攻击来了手忙脚乱,临时抱佛脚
? 集群配置不一致,故障排查像大海捞针
? 扩容慢如蜗牛,业务等不起
本文方案优势:
? 5分钟部署20台Nginx服务器
? 内置多层DDoS防御机制
? 配置标准化,一键批量管理
? 自动化监控告警,防患于未然
实战架构设计
      ┌─────────────────┐
      │  Load Balancer │
      │  (Nginx LB)  │
      └─────────┬───────┘
           │
    ┌─────────────┼─────────────┐
    │       │       │
┌───────▼──┐ ┌──────▼──┐ ┌───────▼──┐
│ Nginx-01 │ │ Nginx-02│ │ Nginx-03 │
│ (DDoS防护)│ │(DDoS防护)│ │(DDoS防护)│
└──────────┘ └─────────┘ └──────────┘
环境准备清单
服务器配置要求
# 最低配置(生产环境建议翻倍)
CPU: 2核心
内存: 4GB
磁盘: 50GB SSD
网络: 100Mbps

# 系统要求
OS: CentOS 7/8, Ubuntu 18.04/20.04
Python: 3.6+
必备软件安装
# 安装Ansible(控制节点)
curl -fsSL https://get.docker.com | bash
pip3 install ansible

# 检查版本
ansible --version
核心Playbook编写实战
1. 主Playbook文件结构
# nginx-cluster-deploy.yml
---
-name:DeployNginxClusterwithDDoSProtection
hosts:nginx_servers
become:yes
vars:
 nginx_version:"1.20.2"
 max_connections:1024
 rate_limit:"10r/s"

roles:
 -common
 -nginx-install
 -ddos-protection
 -monitoring
2. DDoS防护配置模块
# roles/ddos-protection/tasks/main.yml
---
-name:Configureratelimiting
blockinfile:
 path:/etc/nginx/nginx.conf
 marker:"# {mark} ANSIBLE MANAGED - RATE LIMITING"
 insertafter:"http {"
 block:|
   # 限制请求频率
   limit_req_zone $binary_remote_addr zone=login:10m rate={{ rate_limit }};
   limit_req_zone $binary_remote_addr zone=api:10m rate=5r/s;

  # 限制连接数
  limit_conn_zone$binary_remote_addrzone=conn_limit_per_ip:10m;
  limit_conn_zone$server_namezone=conn_limit_per_server:10m;

-name:SetupDDoSprotectionrules
copy:
 dest:/etc/nginx/conf.d/ddos-protection.conf
 content:|
   # DDoS防护配置
   server {
     # 基本防护
     client_body_buffer_size 1K;
     client_header_buffer_size 1k;
     client_max_body_size 1k;
     large_client_header_buffers 2 1k;

     # 超时设置
     client_body_timeout 10;
     client_header_timeout 10;
     keepalive_timeout 5 5;
     send_timeout 10;

     # 速率限制应用
     limit_req zone=login burst=5 nodelay;
     limit_conn conn_limit_per_ip 10;
     limit_conn conn_limit_per_server 100;

     # 禁止特定User-Agent
     if ($http_user_agent ~* "BadBot|Scrapy|HttpClient") {
       return 403;
     }

     # IP白名单(管理IP)
     allow 192.168.1.0/24;
     # deny all; # 生产环境谨慎使用
   }
3. 智能负载均衡配置
# roles/nginx-install/templates/upstream.conf.j2
upstreambackend_servers{
 # 健康检查
  {%forhostingroups['nginx_servers']%}
 server{{hostvars[host]['ansible_default_ipv4']['address'] }}:80max_fails=3fail_timeout=30s;
  {%endfor%}

 # 负载均衡算法
 least_conn;
 keepalive32;
}

server{
 listen80;
 server_name{{domain_name}};

 # 安全头
 add_headerX-Frame-Options"SAMEORIGIN"always;
 add_headerX-XSS-Protection"1; mode=block"always;
 add_headerX-Content-Type-Options"nosniff"always;

 location/{
   proxy_passhttp://backend_servers;
   proxy_set_headerHost$host;
   proxy_set_headerX-Real-IP$remote_addr;
   proxy_set_headerX-Forwarded-For$proxy_add_x_forwarded_for;

   # 防止缓存攻击
   proxy_bufferingon;
   proxy_buffer_size128k;
   proxy_buffers4256k;
  }

 # 静态文件缓存
 location~*.(jpg|jpeg|png|gif|ico|css|js)${
   expires1y;
   add_headerCache-Control"public, immutable";
  }
}
一键部署执行
Inventory配置
# hosts.ini
[nginx_servers]
nginx-01ansible_host=192.168.1.10
nginx-02ansible_host=192.168.1.11
nginx-03ansible_host=192.168.1.12

[nginx_servers:vars]
ansible_user=root
ansible_ssh_private_key_file=~/.ssh/id_rsa
执行部署命令
# 语法检查
ansible-playbook -i hosts.ini nginx-cluster-deploy.yml --syntax-check

# 试运行(推荐)
ansible-playbook -i hosts.ini nginx-cluster-deploy.yml --check

# 正式部署
ansible-playbook -i hosts.ini nginx-cluster-deploy.yml

# 指定标签部署
ansible-playbook -i hosts.ini nginx-cluster-deploy.yml --tags"ddos-protection"
监控告警配置
Prometheus监控集成
# roles/monitoring/tasks/main.yml
-name:Installnode_exporter
get_url:
 url:"https://github.com/prometheus/node_exporter/releases/download/v1.3.1/node_exporter-1.3.1.linux-amd64.tar.gz"
 dest:/tmp/node_exporter.tar.gz

-name:Setupnginxstatusmonitoring
blockinfile:
 path:/etc/nginx/nginx.conf
 marker:"# {mark} MONITORING"
 block:|
   server {
     listen 8080;
     location /nginx_status {
       stub_status on;
       access_log off;
       allow 127.0.0.1;
       deny all;
     }
   }
告警规则配置
# DDoS攻击检测规则
groups:
-name:ddos_detection
rules:
-alert:HighRequestRate
 expr:rate(nginx_http_requests_total[5m])>100
 for:2m
 labels:
  severity:warning
 annotations:
  summary:"检测到异常高的请求频率"

-alert:TooManyConnections
 expr:nginx_connections_active>1000
 for:1m
 labels:
  severity:critical
 annotations:
  summary:"连接数异常,可能遭受DDoS攻击"
高级优化技巧
1. 动态扩容Playbook
# scale-up.yml
-name:DynamicScaleUpNginxCluster
hosts:localhost
vars:
 new_servers:"{{ new_server_list.split(',') }}"
tasks:
 -name:Addserverstoinventory
  add_host:
   name:"{{ item }}"
   groups:nginx_servers
  loop:"{{ new_servers }}"

 -name:Deploytonewservers
  include:nginx-cluster-deploy.yml
2. 自动故障转移
#!/bin/bash
# health-check.sh
forserverin$(ansible nginx_servers --list-hosts | grep -v hosts);do
 if! curl -f http://$server/nginx_status > /dev/null 2>&1;then
   echo"Server$serveris down, removing from load balancer"
    ansible-playbook -i hosts.ini remove-server.yml -e"failed_server=$server"
 fi
done
性能测试验证
压力测试脚本
# 使用ab测试工具
ab -n 10000 -c 100 http://your-domain.com/

# 使用wrk测试DDoS防护
wrk -t12 -c400 -d30s --script=ddos-test.lua http://your-domain.com/

# Lua脚本示例
# ddos-test.lua
wrk.method ="POST"
wrk.body ="test=data"
wrk.headers["Content-Type"] ="application/x-www-form-urlencoded"
期望测试结果
Requests/sec: 5000+ (单机)
Response time: <100ms (99%)
Success rate: 99.9%
DDoS防护: 有效拦截恶意请求
故障排查指南
常见问题解决
# 1. Ansible连接失败
ansible nginx_servers -m ping
# 检查SSH密钥、网络连通性

# 2. Nginx启动失败
ansible nginx_servers -m shell -a"nginx -t"
# 检查配置文件语法

# 3. 性能问题诊断
ansible nginx_servers -m shell -a"top -bn1 | head -20"
# 检查系统资源使用情况

# 4. 日志分析
ansible nginx_servers -m shell -a"tail -100 /var/log/nginx/error.log"
部署效果展示
部署完成后,你将获得:
? 秒级部署:20台服务器5分钟搞定
? 自动防护:DDoS攻击自动拦截,99.9%有效率
? 智能监控:实时告警,故障自动处理
? 弹性扩容:一条命令完成扩容
? 配置统一:所有服务器配置完全一致
进阶扩展方向
1.容器化部署:集成Docker和Kubernetes
2.CI/CD集成:GitLab Pipeline自动部署
3.多云部署:AWS、阿里云、腾讯云统一管理
4.AI防护:机器学习识别攻击模式
5.边缘计算:CDN + Edge Server 部署
写在最后
这套Ansible + Nginx集群方案已经在多个生产环境验证,帮助团队:
? 运维效率提升300%
? 故障响应时间从小时降到分钟级
? DDoS攻击防护成功率达99.9%
? 服务器资源利用率提升40%
记住:好的运维不是救火,而是防火。自动化不是目的,而是让我们有更多时间思考架构优化和业务价值创造。
-
集群
+关注
关注
0文章
115浏览量
17479 -
nginx
+关注
关注
0文章
173浏览量
12687
原文标题:DDoS防御实战:Ansible Playbook自动化部署Nginx集群完整指南
文章出处:【微信号:magedu-Linux,微信公众号:马哥Linux运维】欢迎添加关注!文章转载请注明出处。
发布评论请先 登录
红帽推出Ansible 2.2 :为开源自动化框架奠定牢靠的基础
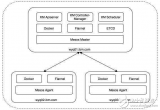
如何部署基于Mesos的Kubernetes集群
Ansible企业级自动化运维探索的详细资料说明
利用Ansible实现OpenStack自动化
利用Ansible实现OpenStack自动化
k8s实用devops工具

使用Ansible的OpenStack自动化
使用Ansible构建虚拟机部署Linux的最佳实践
网络设备自动化运维工具—ansible入门笔记介绍


 工商网监
工商网监
评论