 鸿蒙版微信聊天UI效果实现!

最近开发中要做一个类似微信聊天的工单系统客服中心界面(安卓版)所以想着也模仿一个鸿蒙版(基于 Java UI 的,JS UI 版本的后期更新哈) 那么废话不多数说我们正式开始。
具体实现
mainabiilty 布局文件:
<DependentLayout
xmlns:ohos="http://schemas.huawei.com/res/ohos"
ohos:height="match_parent"
ohos:width="match_parent"
ohos:alignment="center"
ohos:orientation="vertical">

<DependentLayout
ohos:id="$+id:company_page_dl"
ohos:height="50vp"
ohos:width="match_parent"
ohos:orientation="horizontal"
ohos:align_parent_bottom="true"
>

<Button
ohos:id="$+id:main_my_btn"
ohos:width="match_content"
ohos:height="match_content"
ohos:text="发送"
ohos:text_size="35vp"
ohos:align_parent_right="true"
ohos:background_element="$graphic:background_btn"
>
Button>
<TextField
ohos:id="$+id:main_textfiled"
ohos:width="match_parent"
ohos:height="match_parent"
ohos:hint="请输入你的消息"
ohos:vertical_center="true"
ohos:text_size="50"
ohos:left_of="$id:main_my_btn"
ohos:layout_alignment="left"
>
TextField>
DependentLayout>

<ListContainer
ohos:above="$id:company_page_dl"
ohos:id="$+id:main_list"
ohos:height="match_parent"
ohos:width="match_parent"
>
ListContainer>

DependentLayout>
观察布局文件,我们可以看到写了一个列表控件 ListContainer 来装载发送出去的消息和接收到的消息。然后底部写了一个 TextField 控件来处理用户的输入和一个 button 来触发发送的动作。
逻辑代码
我们初始化对应控件并且 listContainer 和适配器绑定到一起:
privatevoidinitview(){
listContainer=(ListContainer)findComponentById(ResourceTable.Id_main_list);
textField=(TextField)findComponentById(ResourceTable.Id_main_textfiled);
mainbtn=(Button)findComponentById(ResourceTable.Id_main_my_btn);
mainbtn.setClickedListener(this);
myProvider=newMyProvider(data,getAbility());
listContainer.setItemProvider(myProvider);
myProvider.notifyDataChanged();//有新消息时,刷新ListView中的显示
}
①初始默认假数据
我们方便展示就写了 3 条假数据仅供展示:
privatevoidinitMsg(){
Msgmsg1=newMsg("你好",Msg.RECEIVED);
data.add(msg1);
Msgmsg2=newMsg("你好呀",Msg.SENT);
data.add(msg2);
Msgmsg3=newMsg("很高兴认识你",Msg.RECEIVED);
data.add(msg3);
}
②用户输入逻辑:
@Override
publicvoidonClick(Componentcomponent){
content=textField.getText().toString();
switch(component.getId()){
caseResourceTable.Id_main_my_btn:
if(!flag){
Msgmsg=newMsg(content,Msg.SENT);
data.add(msg);
flag=true;
}else{
Msgmsg=newMsg(content,Msg.RECEIVED);
data.add(msg);
flag=false;
}
myProvider.notifyDataChanged();//有新消息时,刷新ListView中的显示
textField.setText("");//清空输入框的内容
break;

default:
break;

}

}
我们通过一个布尔值 flag 来做一个开关处理用户输入的,动作轮流来处理是接收到消息还是发送出消息。发送消息:
Msgmsg=newMsg(content,Msg.SENT);
data.add(msg);
接收消息:
Msgmsg=newMsg(content,Msg.RECEIVED);
data.add(msg);
bena 类
packagecom.example.imdemo.bean;

publicclassMsg{

publicstaticfinalintRECEIVED=0;//收到一条消息

publicstaticfinalintSENT=1;//发出一条消息

privateStringcontent;//消息的内容

privateinttype;//消息的类型

publicMsg(Stringcontent,inttype){
this.content=content;
this.type=type;
}

publicStringgetContent(){
returncontent;
}

publicintgetType(){
returntype;
}
}
我们分别定义了 2 个常量和 2 个变量来处理我们的消息逻辑。
适配器
适配器 item.xml 布局:
<DirectionalLayout
xmlns:ohos="http://schemas.huawei.com/res/ohos"
ohos:height="match_content"
ohos:width="match_parent"
ohos:orientation="vertical">
<DirectionalLayout
ohos:id="$+id:left_layout"
ohos:height="match_content"
ohos:width="match_content"
ohos:layout_alignment="left"
ohos:background_element="$graphic:background_blue"
ohos:left_margin="5vp"
ohos:visibility="visible"
ohos:top_margin="10vp"
>

<Text
ohos:id="$+id:left_msg"
ohos:height="match_content"
ohos:width="match_content"
ohos:text="哈哈哈测试"
ohos:text_color="#fff"
ohos:text_size="20vp"
ohos:margin="10vp"
>
Text>

DirectionalLayout>


<DirectionalLayout
ohos:id="$+id:right_Layout"
ohos:height="match_content"
ohos:width="match_content"
ohos:layout_alignment="right"
ohos:background_element="$graphic:background_red"
ohos:right_margin="5vp"
ohos:visibility="visible"
>
<Text
ohos:id="$+id:right_msg"
ohos:height="match_content"
ohos:width="match_content"
ohos:text="哈哈哈测试"
ohos:text_color="#fff"
ohos:text_size="20vp"
ohos:margin="10vp"
>
Text>
DirectionalLayout>
DirectionalLayout>
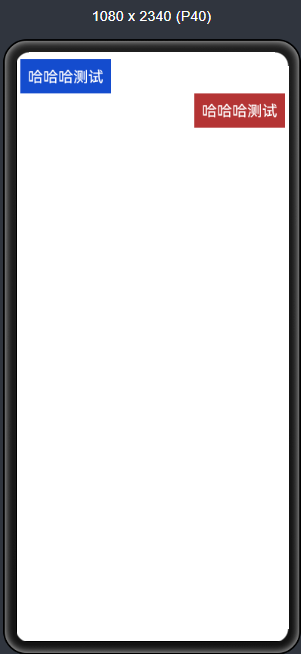
item 布局预览效果:
 适配器逻辑代码:
packagecom.example.imdemo.provider;
importcom.example.imdemo.ResourceTable;
importcom.example.imdemo.bean.Msg;
importohos.aafwk.ability.Ability;
importohos.agp.components.*;
importjava.util.List;
publicclassMyProviderextendsBaseItemProvider{
privateListlist;
privateAbilityability;
publicMyProvider(Listlist,Abilityability) {
this.list=list;
this.ability=ability;
}
@Override
publicintgetCount(){
returnlist.size();
}
@Override
publicObjectgetItem(inti){
returnlist.get(i);
}
@Override
publiclonggetItemId(inti){
returni;
}
@Override
publicComponentgetComponent(inti,Componentcomponent,ComponentContainercomponentContainer){
ViewHodlerhodler=null;
Msgmsg=list.get(i);
if(component==null){
component=LayoutScatter.getInstance(ability).parse(ResourceTable.Layout_item,null,false);
hodler=newViewHodler();
hodler.leftLayout=(DirectionalLayout)component.findComponentById(ResourceTable.Id_left_layout);
hodler.rightLayout=(DirectionalLayout)component.findComponentById(ResourceTable.Id_right_Layout);
hodler.leftMsg=(Text)component.findComponentById(ResourceTable.Id_left_msg);
hodler.rightMsg=(Text)component.findComponentById(ResourceTable.Id_right_msg);
component.setTag(hodler);
}else{
hodler=(ViewHodler)component.getTag();
}
System.out.println("type--->"+msg.getType());
if(msg.getType()==Msg.RECEIVED){
System.out.println("左边消息");
//如果是收到的消息,则显示左边消息布局,将右边消息布局隐藏
hodler.leftLayout.setVisibility(0);
hodler.rightLayout.setVisibility(1);
hodler.leftMsg.setText(msg.getContent());
}elseif(msg.getType()==Msg.SENT){
System.out.println("右边消息");
//如果是发出去的消息,显示右边布局的消息布局,将左边的消息布局隐藏
hodler.rightLayout.setVisibility(0);
hodler.leftLayout.setVisibility(1);
hodler.rightMsg.setText(msg.getContent());
}
returncomponent;
}
classViewHodler{
DirectionalLayoutleftLayout;
DirectionalLayoutrightLayout;
TextleftMsg;
TextrightMsg;
}
}
我们通过在 getComponent 方法中通过小标 i 来遍历集合然后拿到里面每一个对应里面的 type 属性来判断是显示左边布局还是右边布局。
也就是对应的发送消息和接收消息的 UI,我们通过简单布局显示影藏来实现消息的左右两边显示效果,到此整个仿微信聊天的布局 UI 效果就讲完了 。
总结
鸿蒙的仿微信聊天 UI 效果实现起来相对比较简单,其实还有一种办法那就是 ListContainer 的多布局也是通过 bean 里面的标识来显示左右不同的布局实现聊天界面的效果。因为篇幅有限这里就不展开讲了有兴趣的同学可以私下研究。最后希望我的文章能帮助到各位解决问题,以后我还会贡献更多有用的代码分享给大家。
项目地址:
https://gitee.com/qiuyu123/hms_im_demo
编辑:jq
声明:本文内容及配图由入驻作者撰写或者入驻合作网站授权转载。文章观点仅代表作者本人,不代表电子发烧友网立场。文章及其配图仅供工程师学习之用,如有内容侵权或者其他违规问题,请联系本站处理。
举报投诉
-
JAVA
+关注
关注
20文章
2990浏览量
111391 -
JS
+关注
关注
0文章
78浏览量
18529 -
ui
+关注
关注
0文章
208浏览量
21939 -
鸿蒙
+关注
关注
60文章
2656浏览量
44353
原文标题:鸿蒙版微信聊天UI效果实现!
文章出处:【微信号:gh_834c4b3d87fe,微信公众号:OpenHarmony技术社区】欢迎添加关注!文章转载请注明出处。
发布评论请先 登录
相关推荐
热点推荐
微信小程序API集成京东库存,移动端销量暴涨!
。本文将探讨如何通过微信小程序API集成京东库存系统,实现实时数据同步,并最终推动移动端销量实现显著增长。我们将一步步分析集成过程、核心优势,以及实际案例中的
微信小程序+淘宝API,无缝购物体验提升复购率!
能打造一体化的购物旅程,还能显著提升顾客复购率。本文将一步步解析这一创新方案,帮助您理解其核心优势与实现路径。 什么是微信小程序与淘宝API? 微信

鸿蒙应用px,vp,fp概念详解
传统移动端开发方向,转到鸿蒙应用开发方向。 前端开发同学对于开发范式很熟悉,但是对于工作流程和开发方式是会有不适感,其实移动应用开发与前端开发,最大的区别就在于UI适配和性能优化上了。 今天我们就来分析下鸿蒙中
鸿蒙ArkTS+ArkUI仿微信消息列表页制作
\'
})
这里使用了justifyContent属性来进行居中,如果不加这个属性的话,那么100%宽度的row会让文字靠左显示。接下来是显示聊天数据的列表,这里采用ForEach列表渲染来实现。组件上的话
发表于 06-30 18:28
UI开发概述
的渲染效果。开发者可以将系统内置组件组合为自定义组件,通过这种方式将页面组件化为一个个独立的UI单元,实现页面不同单元的独立创建、开发和复用,具有更强的工程性。
页面路由和组件导航
应用可能包含多个页面
发表于 06-24 06:36
鸿蒙Next实现瀑布流布局
为了实现类似真实瀑布流不断加载新数据的效果,可以结合鸿蒙的 LazyForEach 组件,在滚动到列表底部时触发数据加载逻辑
六、网络权限
// config.json
{
\"module
发表于 06-10 14:17
HarmonyOS实战:快递信息时间轴效果实现
前言 快递信息时间轴在购物软件中是必不可少的功能,通过时间轴可以展示快递从发货到派送的每一个环节。本篇文章通过代码的形式详细讲解在鸿蒙日常开发中如何实现时间轴的效果。(篇尾附有完整源码) 实现
Kuikly鸿蒙版正式开源 —— 揭秘卓越性能适配之旅
的 ArkUI 来编写的,UI组件由数据和UI描述组成,UI更新只能通过修改其绑定的数据来实现。渲染层怎样驱动声明式的ArkUI成为了鸿蒙版
发表于 06-04 16:46
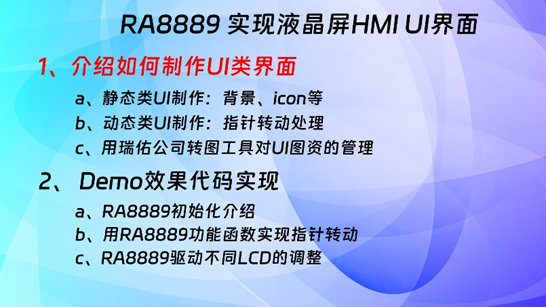
第二篇 RA8889 实现酷炫车载液晶仪表系列视频: UI类界面介绍
本系列文章介绍 RA8889 实现液晶仪表HMI UI界面,分为两大部分来介绍,本期介绍如何制作UI类界面,其中包括使用PS软件制作静态类UI界面,Ae软件制作动态类的
HarmonyOS NEXT 原生应用开发:社交聊天对话过程实现
一、实现思路
本DEMO旨在展示如何在HarmonyOS NEXT平台上,利用ArkTS开发语言构建一个简易的社交聊天对话界面。用户可以在此界面上查看聊天记录,并发送新的消息。此示例中,聊天
发表于 01-07 10:55
自动化创建UI并解析数据
Labview实现动态增加控件效果 - *附件:32960_auto.rar
备注:Main.vi是ui自动化2.1.vi,配置文件为32960.B.ini。
目前可以实现根据配置文件
发表于 11-29 11:26
Linux微信4.0.0版发布,功能再升级
近日,备受瞩目的Linux微信4.0.0版本终于迎来了正式发布。此次版本更新不仅带来了多项实用功能,还实现了与Windows、macOS公测版本的功能一致和更新同步,为用户带来了更加便捷
名单公布!【书籍评测活动NO.47】HarmonyOS NEXT启程:零基础构建纯血鸿蒙应用
本期评测名单如下
赵龙、华为开发者论坛 、邓文权、iwpgk、夜孤影
请以上几位大佬联系工作人员(微信:elecfans123)领取书籍进行评测,如在5个工作日内未联系,视为放弃本次试用评测资格
发表于 10-14 14:36


 工商网监
工商网监
评论