 电子发烧友App


 创作
创作 发文章
发文章 发帖
发帖  提问
提问  发资料
发资料 发视频
发视频资料介绍
描述
问题
我必须不断调整我的加热器以保持合适的温度。此外,有时我离开家时忘记关掉暖气。
解决方案
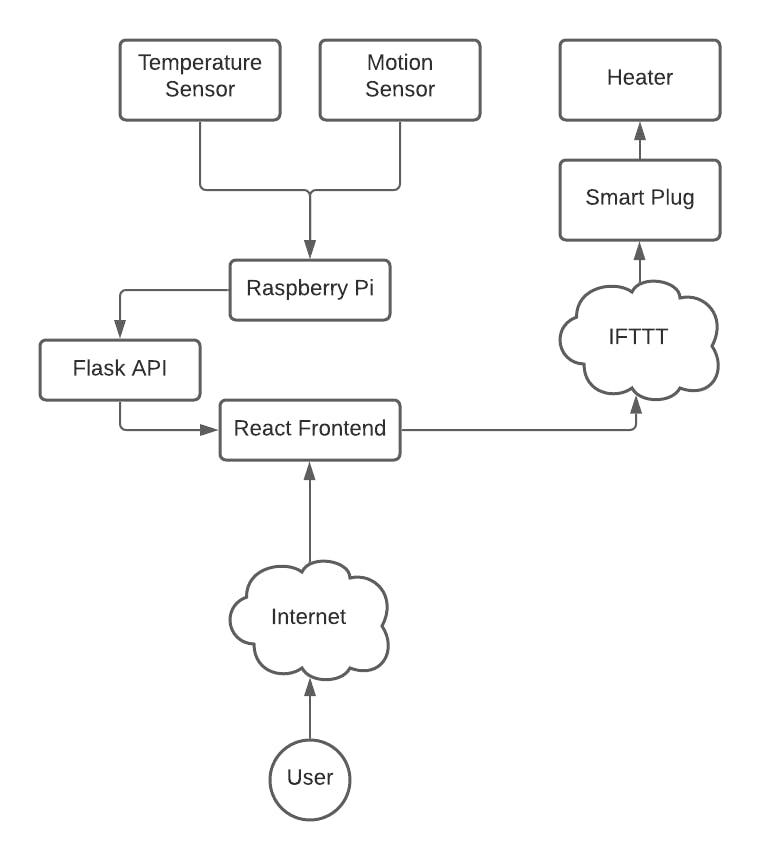
设置温度和运动传感器以捕获环境数据。创建一个网络应用程序,允许用户设置他们想要的温度,这将控制加热器的关闭或打开方式。
这是一个图表,显示了一切将如何交互。
第 1 步 - 使用 Raspberry Pi 设置传感器
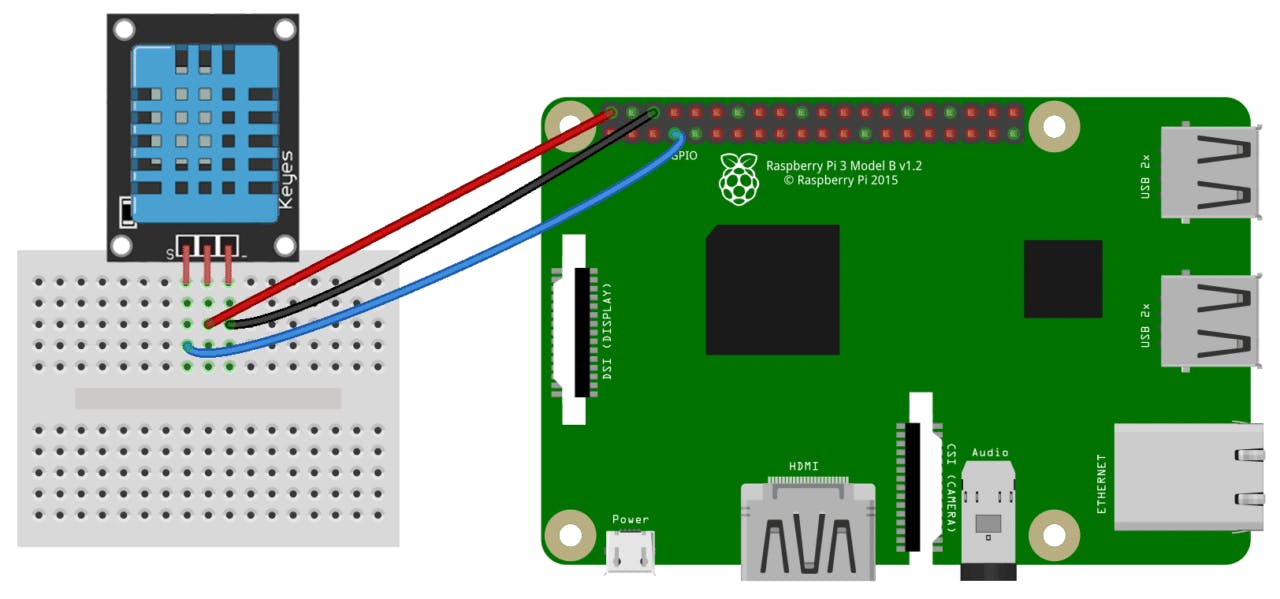
获得 DHT11 温度和 PIR 运动传感器后,是时候将其连接到 Raspberry Pi。
以下是如何连接 DHT11 温度传感器。我放弃了面包板并使用引脚 1(3V3)而不是引脚 2(5V)供电,从而偏离了图表。
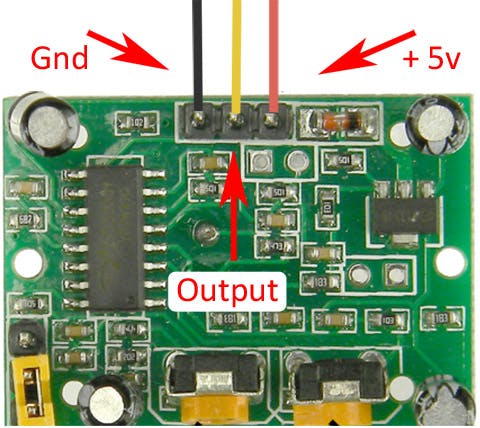
以下是如何连接 PIR 运动传感器。LED 连接是可选的。我通过将 Gnd 连接到引脚 20(接地)而不是引脚 6(接地),输出到引脚 36(GPIO 16)而不是引脚 8(GPIO 14)和 LED 连接到引脚 40(GPIO 21)而不是引脚 10(GPIO 15)。
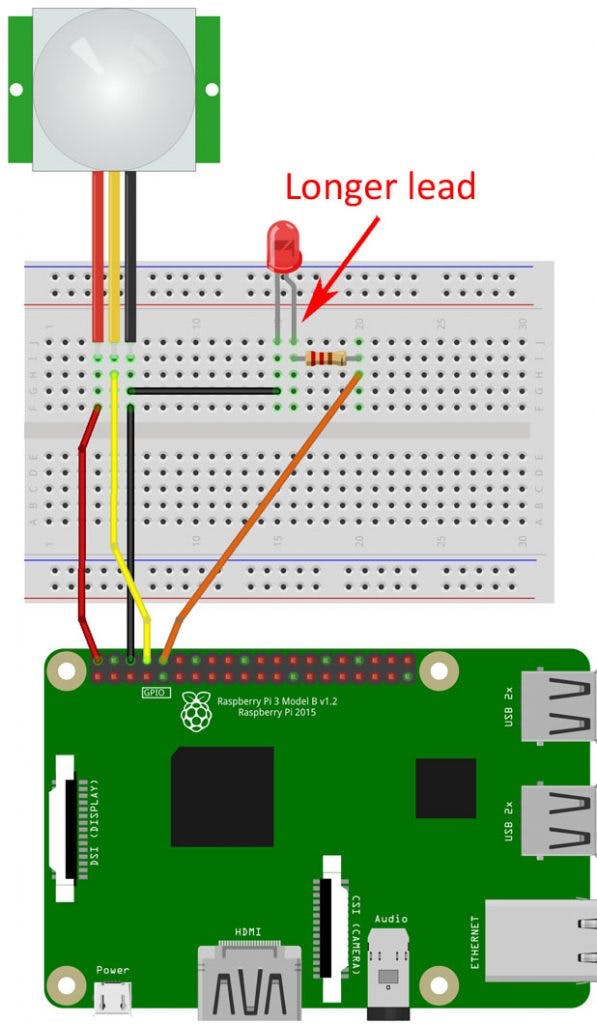
两者连接时的最终结果:
这里我的 PIR 传感器连接到 GPIO 16,DHT11 连接到 GPIO4。温度传感器应放置在您想要获得正确温度的位置,而运动传感器应朝向您通常所在的位置。
第 2 步 - 编写代码来测试传感器
下面是测试运动传感器的 Python 代码(不要忘记在此处安装 RPi.GPIO https://pypi.org/project/RPi.GPIO/ ):
import RPi.GPIO as GPIO
from time import sleep

GPIO.setmode(GPIO.BCM)

motion_pin = 16
led_pin = 21

GPIO.setup(motion_pin, GPIO.IN)
GPIO.setup(led_pin, GPIO.OUT)

print("Sensor initializing . . .")
sleep(2)

try:
    no_motion_count = 0

    while True:
        if GPIO.input(motion_pin) == True:
            print("Motion Detected!")
            GPIO.output(led_pin, True)
            sleep(4)
            GPIO.output(led_pin, False)
            no_motion_count = 0
        else:
            no_motion_count += 1

        print(f"No Motion Count: {no_motion_count}")

        sleep(1)

except KeyboardInterrupt:
    pass
finally:
    GPIO.output(led_pin, False)
    GPIO.cleanup()
下面是测试温度传感器的 Python 代码(不要忘记在此处安装 Adafruit_DHT https://pypi.org/project/Adafruit_Python_DHT/ ):
import Adafruit_DHT
from time import sleep

temperature_humidity_sensor = Adafruit_DHT.DHT11
gpio_pin = 4

try:
    while True:
        humidity, temperature = Adafruit_DHT.read_retry(
            temperature_humidity_sensor, gpio_pin)
        if humidity is not None and temperature is not None:
            print(
                'Temp={0:0.1f}*C  Humidity={1:0.1f}%'.format(temperature, humidity))
        else:
            print('Failed to get reading. Try again!')
        sleep(0.5)
except KeyboardInterrupt:
    pass
这是两者结合的代码:
import RPi.GPIO as GPIO
import Adafruit_DHT
from time import sleep

GPIO.setmode(GPIO.BCM)

# Motion

motion_pin = 16
led_pin = 21
no_motion_count = 0

GPIO.setup(motion_pin, GPIO.IN)
GPIO.setup(led_pin, GPIO.OUT)


def handle_motion(no_motion_count):
    if GPIO.input(motion_pin) == True:
        print("Motion Detected!")
        GPIO.output(led_pin, True)
        sleep(4)
        GPIO.output(led_pin, False)
        no_motion_count = 0
        return 0
    else:
        return no_motion_count + 1


# Temperature + Humidity
temperature_humidity_sensor = Adafruit_DHT.DHT11
gpio_pin = 4


def handle_temperature():
    humidity, temperature = Adafruit_DHT.read_retry(
        temperature_humidity_sensor, gpio_pin)
    if humidity is not None and temperature is not None:
        print(
            'Temperature = {0:0.1f}*C  Humidity = {1:0.1f}%'.format(temperature, humidity))
        return temperature
    else:
        print('Failed to read Temperature/Humidity')

# Run Program


print("Sensor initializing . . .")
sleep(5)


try:
    no_motion_count = 0
    desired_temperature = 28
    desired_temperature_margin = 2

    while True:
        temperature = handle_temperature()
        no_motion_count = handle_motion(no_motion_count)

        if no_motion_count >= 20:
            print(f"No Human Detected.")
        elif temperature > desired_temperature + desired_temperature_margin:
            print(f"Temperature Too High")
        elif temperature < desired_temperature - desired_temperature_margin:
            print(f"Temperature Too Low")
        else:
            print(f"Temperature Just Right")

        print(f"No Motion Count: {no_motion_count}")

        sleep(0.25)
except KeyboardInterrupt:
    pass
finally:
    GPIO.output(led_pin, False)
    GPIO.cleanup()
第 3 步 - 开发 Flask API 以公开传感器数据
在我们可以让传感器工作之后,它的服务时间是通过一个 API,在本例中是一个 Flask API。下面是重要的代码,但请参考我的 GitHub 存储库https://github.com/sometheasiekswx/smart-heater-api-flask以查看所有代码(不要忘记在此处安装 Flask https://flask .palletsprojects.com/en/2.0.x/quickstart/和 Flask-CORS 在这里https://flask-cors.readthedocs.io/en/latest/ ):
from operator import itemgetter
from signal import signal, SIGINT
from sys import exit
from time import sleep

import RPi.GPIO as GPIO
from Adafruit_DHT import DHT11, read_retry
from flask import Flask
from flask_cors import CORS

GPIO.setmode(GPIO.BCM)

# Motion

motion_pin = 16
led_pin = 21
no_motion_count = 0

GPIO.setup(motion_pin, GPIO.IN)
GPIO.setup(led_pin, GPIO.OUT)

# Temperature + Humidity

temperature_humidity_sensor = DHT11
gpio_pin = 4

# Run Program

print("Sensor initializing . . .")
sleep(5)

app = Flask(__name__)
cors = CORS(app, resources={r"/api/*": {"origins": "*"}})

no_motion_count = 0
desired_temperature = 28
desired_temperature_margin = 2


@app.route("/api/v1/temperature")
def get_temperature():
    humidity, temperature = read_retry(
        temperature_humidity_sensor, gpio_pin)
    if humidity is not None and temperature is not None:
        return str(temperature)

    return 'Unknown'


@app.route("/api/v1/motion")
def get_motion():
    if GPIO.input(motion_pin):
        GPIO.output(led_pin, True)
        return "true"

    GPIO.output(led_pin, False)
    return "false"


def has_no_empty_params(rule):
    defaults = rule.defaults if rule.defaults is not None else ()
    arguments = rule.arguments if rule.arguments is not None else ()
    return len(defaults) >= len(arguments)


@app.cli.command()
def routes():
    'Display registered routes'
    rules = []
    for rule in app.url_map.iter_rules():
        methods = ','.join(sorted(rule.methods))
        rules.append((rule.endpoint, methods, str(rule)))

    sort_by_rule = itemgetter(2)
    for endpoint, methods, rule in sorted(rules, key=sort_by_rule):
        route = '{:50s} {:25s} {}'.format(endpoint, methods, rule)
        print(route)


@app.route("/")
def main():
    return """
        Smart Heater API


            Endpoint
            Method
            Rule


            get_motion
            GET
            /api/v1/motion


            get_temperature
            GET
            /api/v1/temperature


    """


def cleanup(signal, frame):
    print('Closing API...')
    GPIO.output(led_pin, False)
    GPIO.cleanup()
    exit(0)


signal(SIGINT, cleanup)
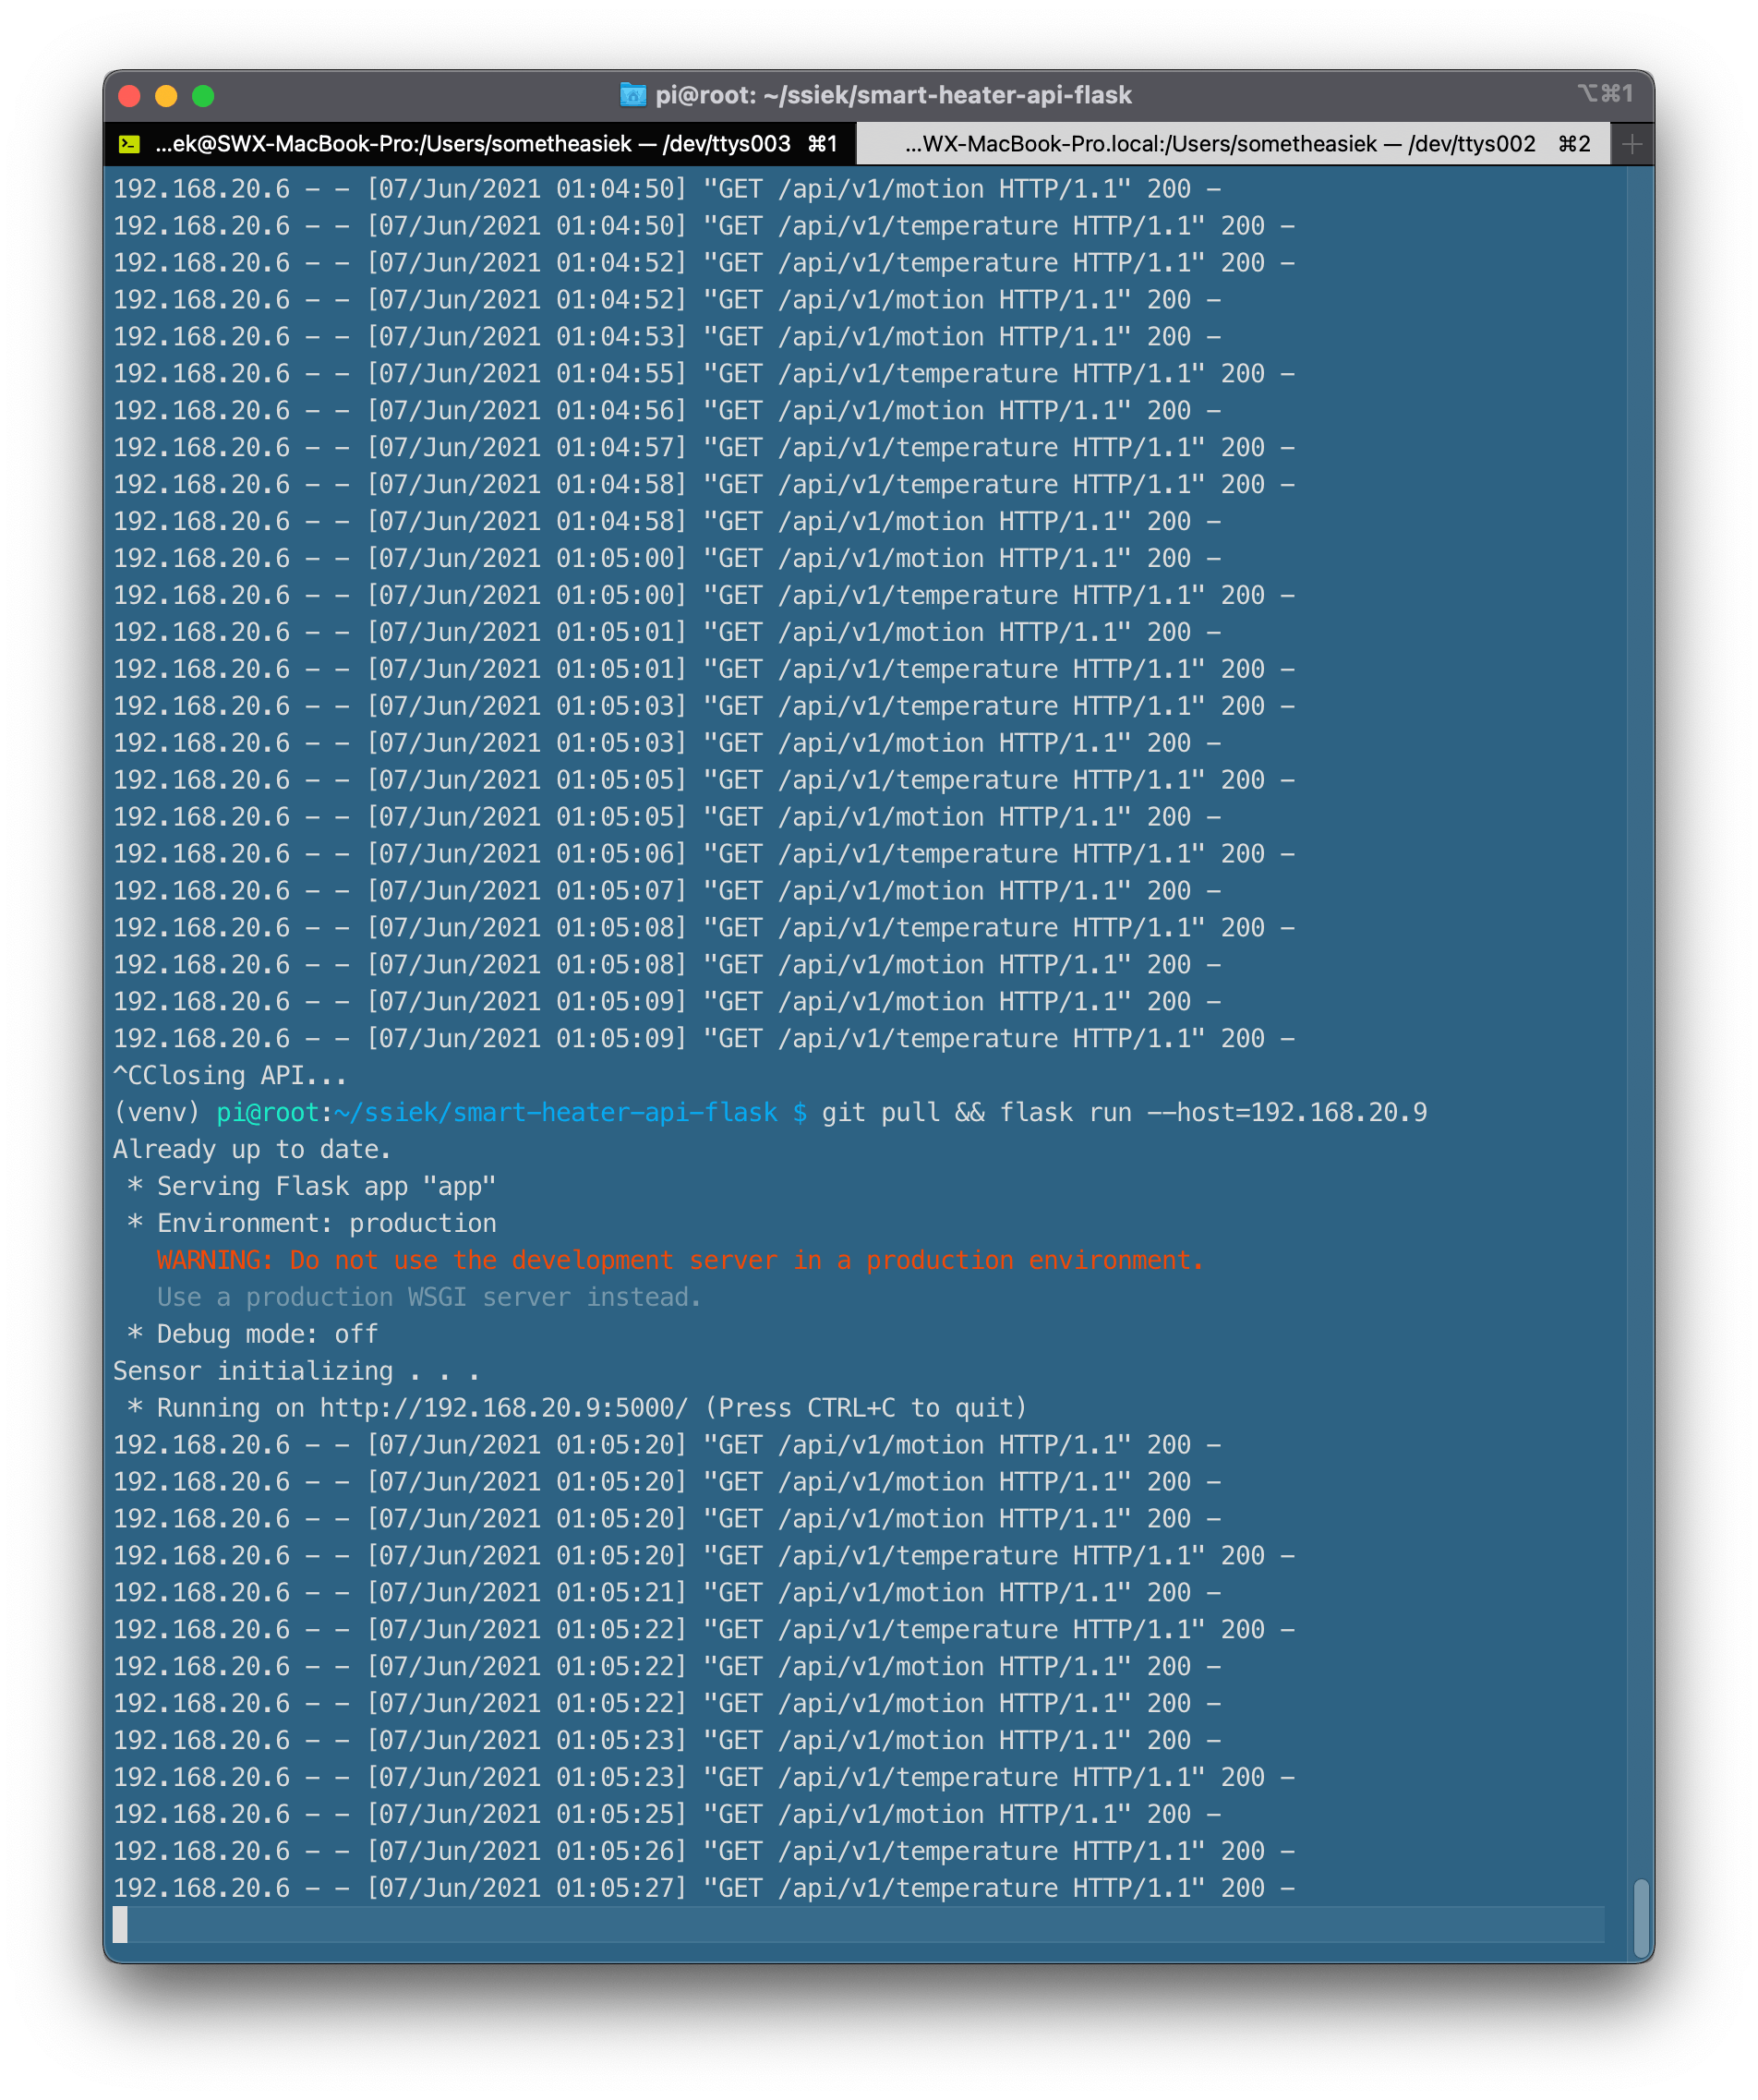
在 Raspberry Pi 上添加代码后,以下是如何运行代码以及访问在 Raspberry Pi 上设置的端点时应该得到的结果(尝试从同一网络上的不同设备访问端点以测试是否CORS 策略正常工作):
第 4 步 - 使用 IFTTT 设置智能插头
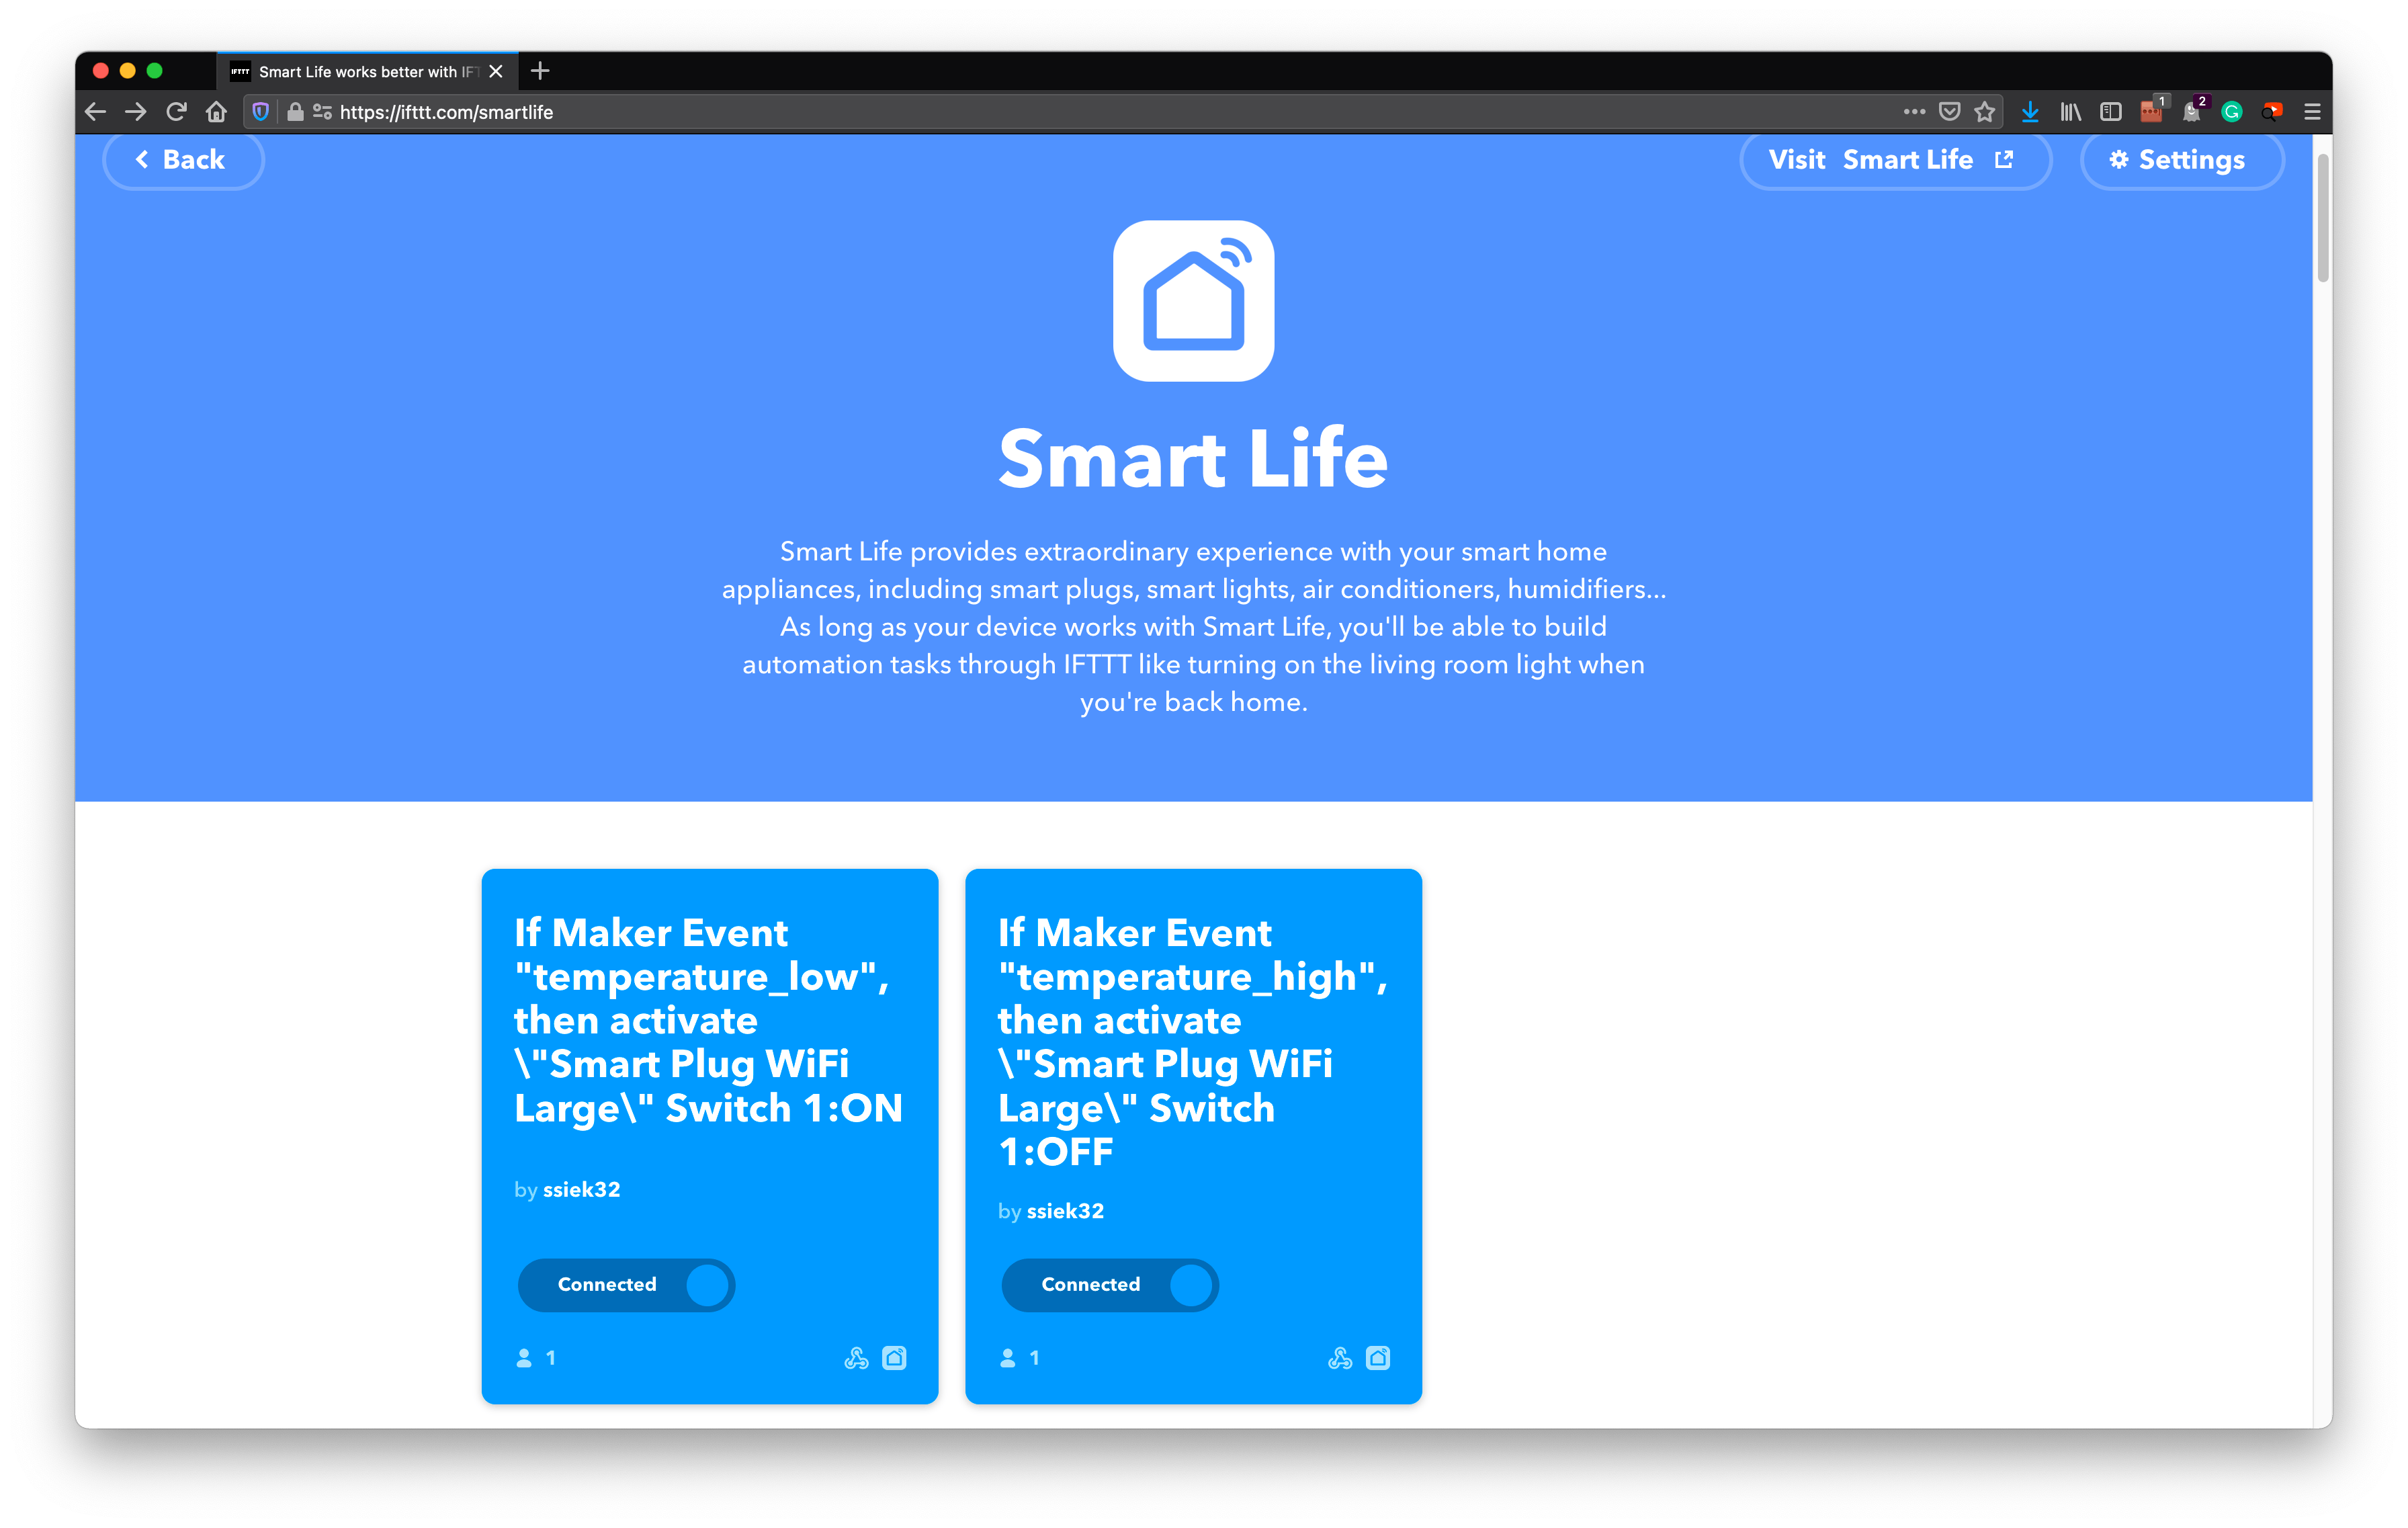
此步骤将根据您碰巧选择的支持 WI-FI 的智能插头品牌而有所不同。对我来说,我选择了Powertech Wi-Fi Smart Plug ,这需要我使用Smart Life应用程序进行设置。无论您使用哪种品牌,请按照说明连接插头。然后,转到IFTTT ,创建一个帐户,然后搜索 IFTTT 与您的智能插头应用程序的集成。
设置两个小程序。第一个触发器是是否触发了关闭加热器的 GET 请求(事件名称 temperature_high)。第二个触发器是是否触发了打开加热器的 GET 请求(事件名称 temperature_low)。
第 4 步 - 开发 React 前端来控制一切
最后,我们将开发这个漂亮的前端:
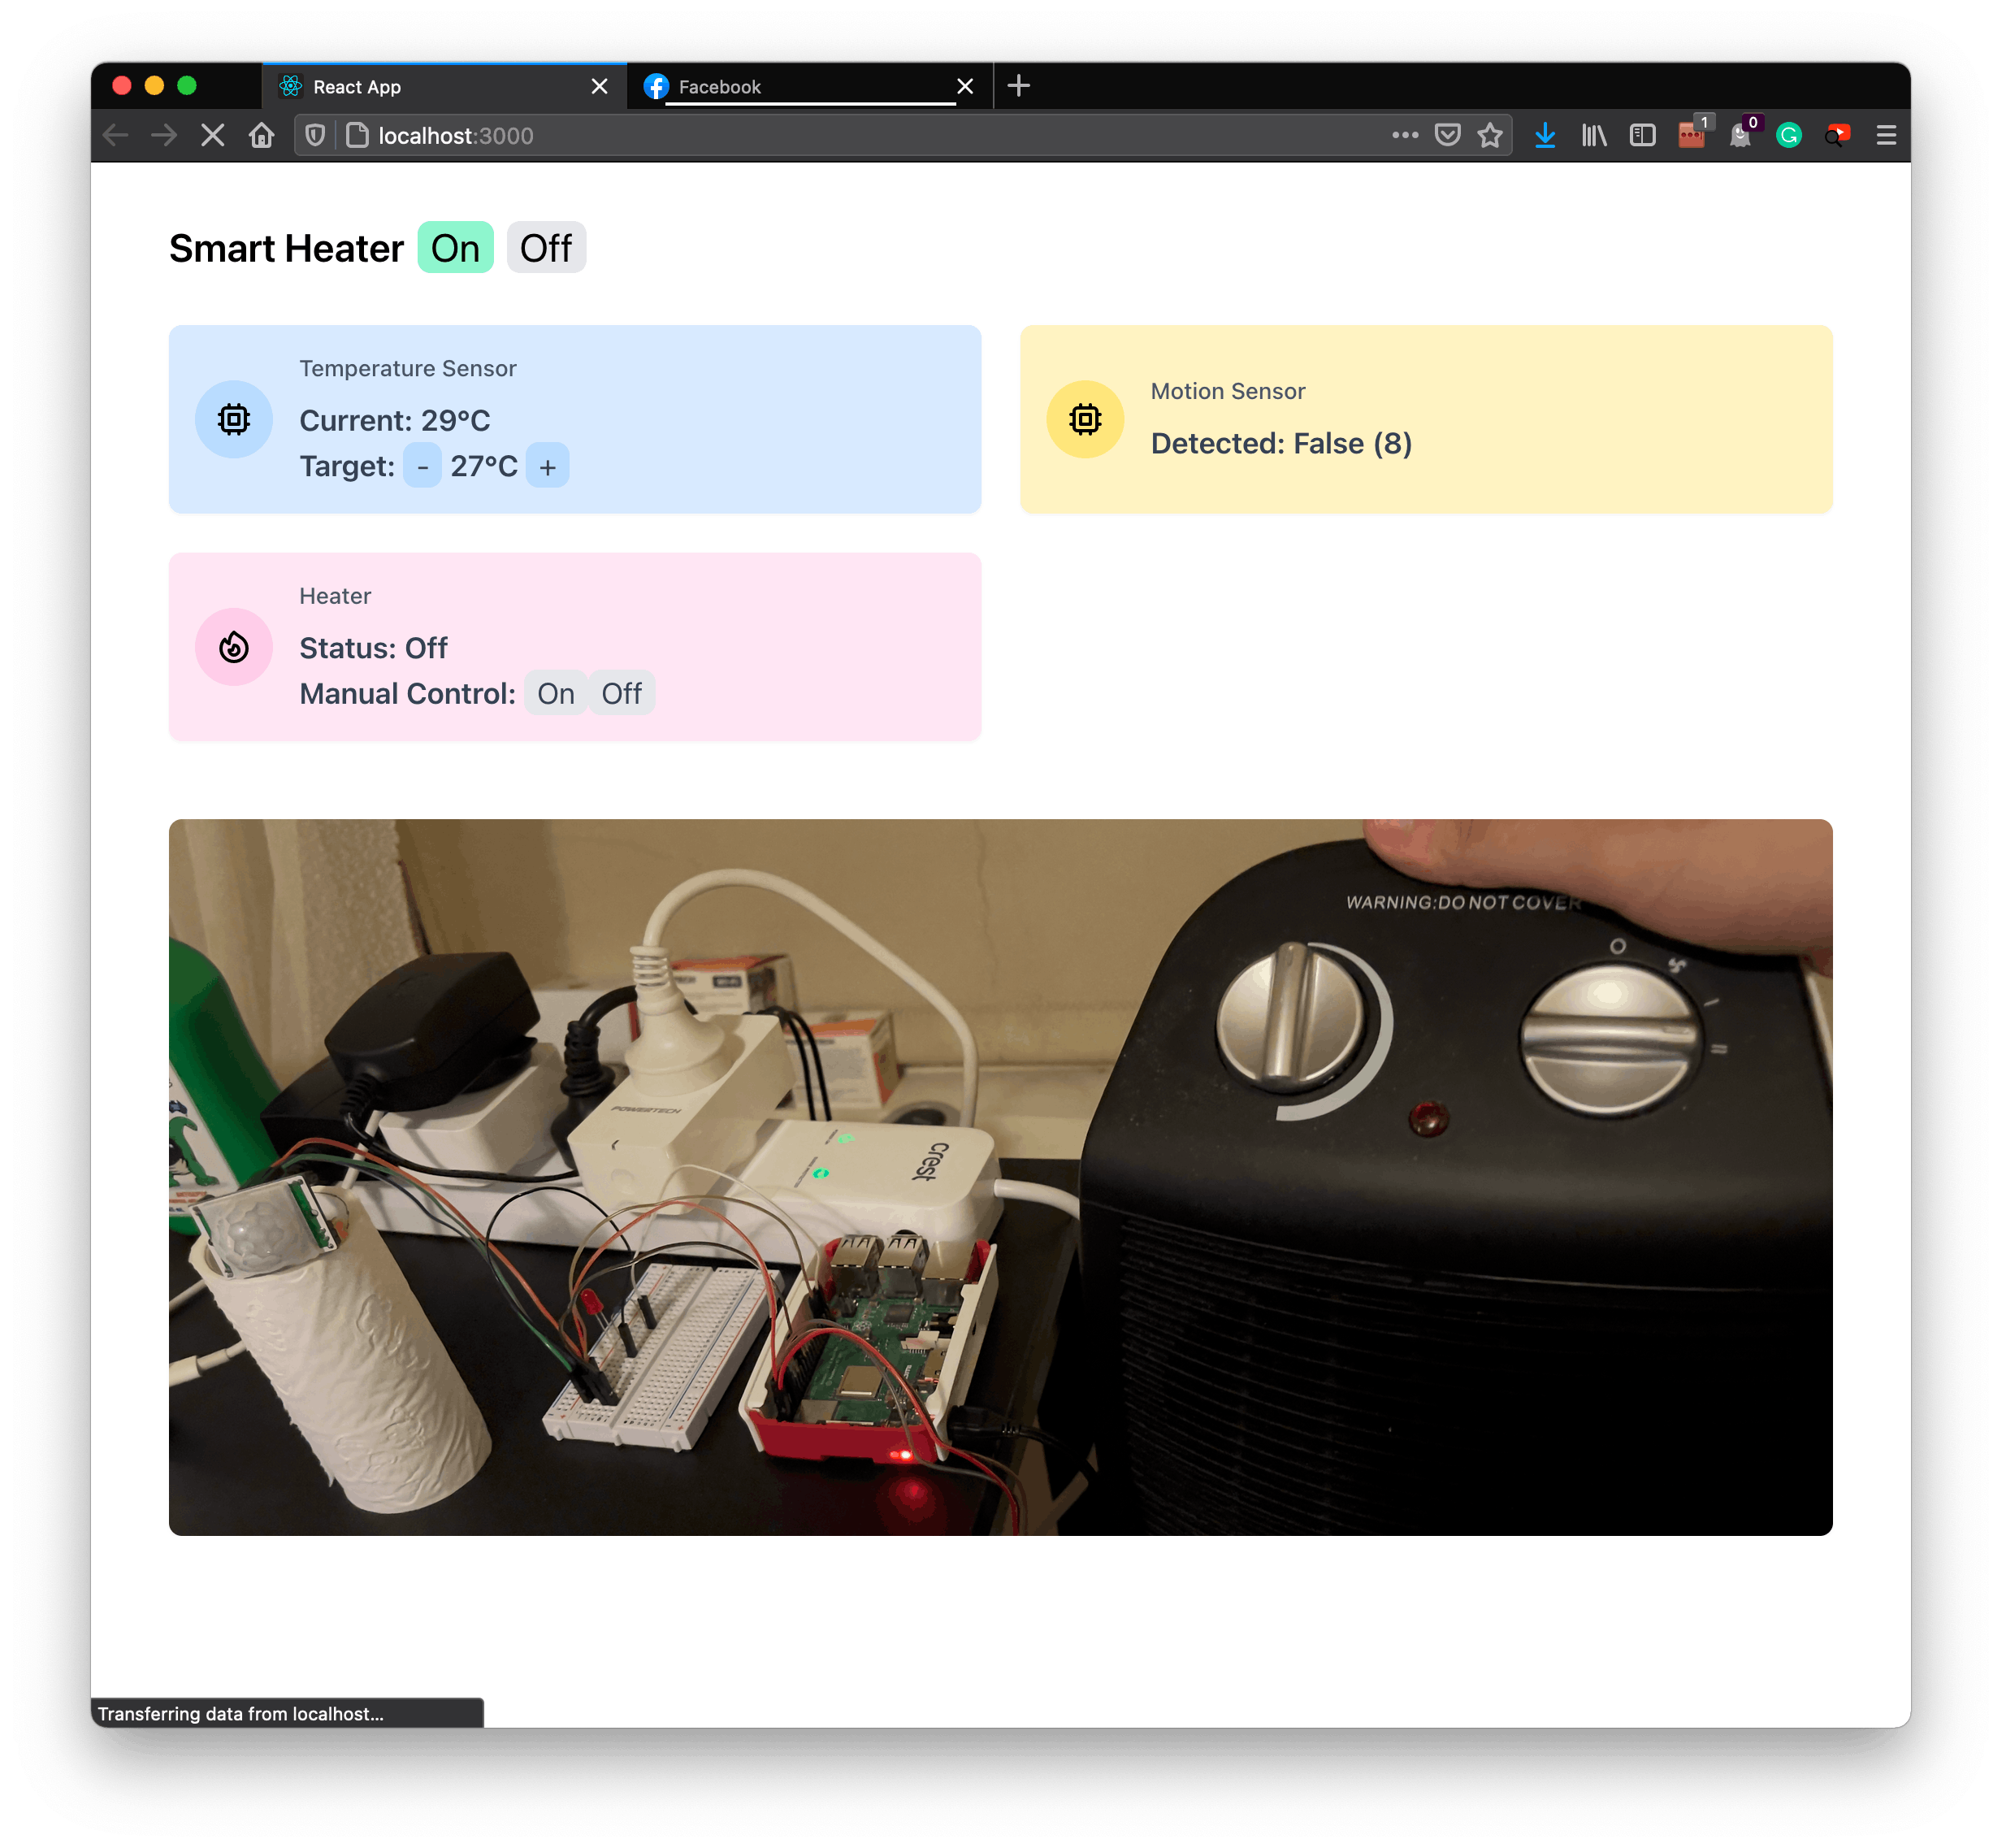
我使用 ReactJs 和 TailWindCss 来创建 Web 应用程序,因此它可以帮助您拥有这些技术的先前经验。是帮助您入门的完美资源。您还可以使用您喜欢的任何其他框架(Angular、Laravel)或语言(HTML + CSS + JSS)来构建网站。
共有三张卡: 1. 温度传感器,显示当前温度,可以设置目标温度 2. 运动传感器,我们可以看到是否检测到任何运动,如果太长时间没有检测到运动,我们可以自动关闭加热器 3. 加热器状态为关闭或开启,也可手动控制智能加热器系统关闭。
这是我们从前端进行 API 调用的示例:
import axios from 'axios';

const sensorsApi = axios.create({
    baseURL: `http://${process.env.REACT_APP_API_HOST}:${process.env.REACT_APP_API_PORT}/api/v1/`,
});

const heaterApi  = axios.create({
    baseURL: `https://maker.ifttt.com/trigger/`,
});

export const turnOffHeater = async () => {
    try {
        await heaterApi.get(`temperature_high/with/key/${process.env.REACT_APP_IFTTT_WEBHOOK_KEY}`);
    } catch (error) {
        console.log(error.message);
    }
}

export const turnOnHeater = async () => {
    try {
        await heaterApi.get(`temperature_low/with/key/${process.env.REACT_APP_IFTTT_WEBHOOK_KEY}`);
    } catch (error) {
        console.log(error.message);
    }
}

export const getTemperature = async () => {
    try {
        const data = (await sensorsApi.get('temperature')).data;
        return parseFloat(data);
    } catch (error) {
        console.log(sensorsApi)
        console.log(error.message);
    }
}

export const getMotion = async () => {
    try {
        const data = (await sensorsApi.get('motion')).data;
        return data === 'true';
    } catch (error) {
        console.log(error.message);
    }
}
这是我如何使用这些异步函数的示例。它还显示加热器将根据它是否低于或高于目标温度来打开和关闭。
import {useEffect, useState} from "react";
import {getMotion, getTemperature, turnOffHeater, turnOnHeater} from "../utils/api";
import {CronJob} from "cron";

function Devices() {
    const [currentTemperature, setCurrentTemperature] = useState(0);
    const [targetTemperature, setTargetTemperature] = useState(25);
    const [targetTemperatureMargin] = useState(2);
    const [heaterOn, setHeaterOn] = useState(false);
    const handleTemperature = async () => {
        const temperature = await getTemperature();
        setCurrentTemperature(temperature);
        console.log(currentTemperature, targetTemperature);
        if (currentTemperature >= targetTemperature + targetTemperatureMargin && heaterOn) {
            await turnOffHeater();
            setHeaterOn(false);
        } else if (currentTemperature <= targetTemperature - targetTemperatureMargin && !heaterOn) {
            await turnOnHeater();
            setHeaterOn(true);
        }
    }
    const [jobTemperature] = useState(new CronJob("* * * * * *", handleTemperature()));
以下是运动逻辑的设置方式:
const handleMotion = async () => {
    const newMotion = await getMotion();
    if (newMotion === false) {
        setNoMotion(noMotion + 1)
    } else {
        setNoMotion(0)
        setMotion(true);
    }

    if (noMotion > 50) {
        setMotion(false);
    }
}
最后的想法
我在这里只展示重要的代码,你可以在附件中找到整个前端和后端代码库,以及完成这个项目所需的电子设备和传感器。祝你好运!
- PTC加热器 REV1
- 康普茶加热器开源分享
- 带PID温度控制的加热器开源分享
- 脉冲感应加热器开源分享
- 炜固专业级单相加热器断线报警器US17资料 10次下载
- 加热器短线报警器原理、分类和选型 5次下载
- 开源硬件-TIDA-01184-适用于座椅加热器的智能电源开关 PCB layout 设计
- 透明加热器的应用
- 浸没式汽水混合加热器
- 国产300MW高压加热器泄漏原因分析及预防措施
- 超临界高压加热器研制
- 大客车液体加热器安装要点
- 风暖加热器油烟味产生的原因及其改进方法
- 国内外汽车燃油加热器技术比较及发展
- 实用高精度智能恒温加热器系统设计
- 高压加热器自动旁路保护装置的作用 491次阅读
- 功率放大器在微型加热器中的应用 1184次阅读
- 使用MOSFET作为恒温加热器 1489次阅读
- 电烙铁的加热器的结构组成与温度控制方法分析 1w次阅读
- 低压加热器工作原理_低压加热器的作用 1.9w次阅读
- 恒温加热器的工作原理_恒温加热器保养 1.8w次阅读
- 汽车驻车加热器的工作原理详解 3.6w次阅读
- 如何正确使用防爆电加热器 4167次阅读
- 电加热器的分类及对比 1w次阅读
- 一文了解电加热器是什么 6243次阅读
- 电加热器功率计算方法 6.2w次阅读
- 简易加热器制作 1.8w次阅读
- PTC加热器原理及功能 24w次阅读
- 用于植物的土壤加热器 3964次阅读
- 加热器控制电路图 2.6w次阅读

 上传资料赚积分
下载排行
本周
- 1山景DSP芯片AP8248A2数据手册
- 1.06 MB | 532次下载 | 免费
- 2RK3399完整板原理图(支持平板,盒子VR)
- 3.28 MB | 339次下载 | 免费
- 3TC358743XBG评估板参考手册
- 1.36 MB | 330次下载 | 免费
- 4DFM软件使用教程
- 0.84 MB | 295次下载 | 免费
- 5元宇宙深度解析—未来的未来-风口还是泡沫
- 6.40 MB | 227次下载 | 免费
- 6迪文DGUS开发指南
- 31.67 MB | 194次下载 | 免费
- 7元宇宙底层硬件系列报告
- 13.42 MB | 182次下载 | 免费
- 8FP5207XR-G1中文应用手册
- 1.09 MB | 178次下载 | 免费
本月
- 1OrCAD10.5下载OrCAD10.5中文版软件
- 0.00 MB | 234315次下载 | 免费
- 2555集成电路应用800例(新编版)
- 0.00 MB | 33566次下载 | 免费
- 3接口电路图大全
- 未知 | 30323次下载 | 免费
- 4开关电源设计实例指南
- 未知 | 21549次下载 | 免费
- 5电气工程师手册免费下载(新编第二版pdf电子书)
- 0.00 MB | 15349次下载 | 免费
- 6数字电路基础pdf(下载)
- 未知 | 13750次下载 | 免费
- 7电子制作实例集锦 下载
- 未知 | 8113次下载 | 免费
- 8《LED驱动电路设计》 温德尔著
- 0.00 MB | 6656次下载 | 免费
总榜
- 1matlab软件下载入口
- 未知 | 935054次下载 | 免费
- 2protel99se软件下载(可英文版转中文版)
- 78.1 MB | 537798次下载 | 免费
- 3MATLAB 7.1 下载 (含软件介绍)
- 未知 | 420027次下载 | 免费
- 4OrCAD10.5下载OrCAD10.5中文版软件
- 0.00 MB | 234315次下载 | 免费
- 5Altium DXP2002下载入口
- 未知 | 233046次下载 | 免费
- 6电路仿真软件multisim 10.0免费下载
- 340992 | 191187次下载 | 免费
- 7十天学会AVR单片机与C语言视频教程 下载
- 158M | 183279次下载 | 免费
- 8proe5.0野火版下载(中文版免费下载)
- 未知 | 138040次下载 | 免费


 工商网监
工商网监
评论