 如何在TPU上使用JAX训练GPT-2模型

作者 / 魏巍,开发技术推广工程师
如果您对如何使用 JAX 从头开始构建语言模型感到好奇,那么本文非常适合您。我们在 2025 年 Google Cloud Next 大会上举办了一场关于此主题的研讨会,并获得了一些很好的反馈,我们也为所有无法参会的开发者编写了这份指南。
本文和代码示例将引导您构建并预训练 GPT-2 模型,了解 JAX 如何直接利用 Google TPU 的强大能力。您可以使用 Colab 或 Kaggle 中的 TPU 免费运行整个项目,并获取完整的Notebook。
Notebook
https://github.com/windmaple/LLM_from_scratch.JAX/tree/main/02.GPT2-pretraining
这是一个实践教程,如果您还不熟悉 JAX,我们建议您从《PyTorch 开发者指南: JAX 基础知识》入手。
PyTorch 开发者指南: JAX 基础知识
https://cloud.google.com/blog/products/ai-machine-learning/guide-to-jax-for-pytorch-developers
首先,让我们快速了解一下将要用到的工具。
JAX 生态系统
在开始构建模型之前,让我们先简要介绍一下 JAX 生态系统。JAX 生态系统采用模块化方法,通过 JAX 核心提供核心数值处理能力,而一系列丰富的库则在此基础上构建而成,以满足不同应用的特定需求,如用于构建神经网络的Flax、用于检查点和模型持久性的Orbax以及用于优化的Optax(在本文中,这 3 个工具都将被用到)。内置函数转换,如 autograd、矢量化和 JIT 编译,加上强大的性能和易于使用的 API,使 JAX 非常适合训练大语言模型。
JAX 生态系统
https://docs.jax.dev/en/latest/#ecosystem
Flax
https://github.com/google/flax
Orbax
https://github.com/google/orbax
Optax
https://github.com/google-deepmind/optax
入门指南: 构建您的 GPT-2 模型
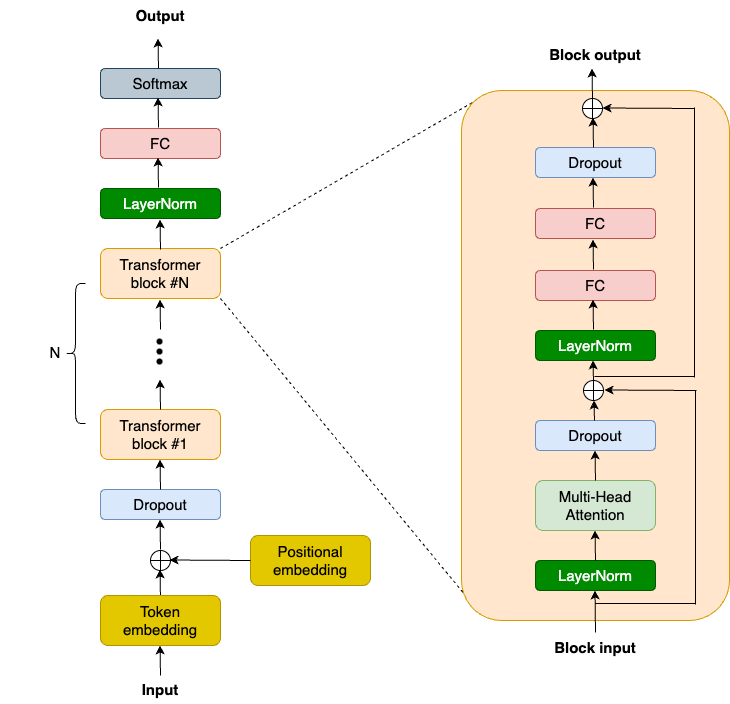
OpenAI 此前发布了GPT-2 模型代码和权重,这为我们提供了宝贵的参考资料,并且社区也付出了很多努力来复现该模型,例如nanoGPT。以下是 GPT-2 的高层级模型架构图:
GPT-2 模型代码和权重
https://github.com/openai/gpt-2
nanoGPT
https://github.com/karpathy/nanoGPT
我们将使用NNX (新的 Flax 接口)来构建 GPT-2 模型。简洁起见,我们重点关注 Transformer Block,这是现代大语言模型的关键所在。Transformer Block 会捕获任何序列的长程依赖关系,并构建丰富的上下文理解。GPT-2 Transformer Block 由 2 个 LayerNorm 层、1 个多头注意力 (MHA) 层、2 个 Dropout 层、2 个线性投影层和 2 个残差连接组成。因此,我们首先需要在TransformerBlock类的__init__函数中定义这些层:
classTransformerBlock(nnx.Module):
 def__init__(
    self,
    embed_dim:int,
    num_heads:int,
    ff_dim:int,
    dropout_rate:float,
    rngs: nnx.Rngs,
  ):
    self.layer_norm1 = nnx.LayerNorm(
      epsilon=1e-6, num_features=embed_dim, rngs=rngs
    )
    self.mha = nnx.MultiHeadAttention(
      num_heads=num_heads, in_features=embed_dim, rngs=rngs
    )
    self.dropout1 = nnx.Dropout(rate=dropout_rate)
    self.layer_norm2 = nnx.LayerNorm(
      epsilon=1e-6, num_features=embed_dim, rngs=rngs
    )
    self.linear1 = nnx.Linear(
      in_features=embed_dim, out_features=ff_dim, rngs=rngs
    )
    self.linear2 = nnx.Linear(
      in_features=ff_dim, out_features=embed_dim, rngs=rngs
    )
    self.dropout2 = nnx.Dropout(rate=dropout_rate)
NNX (新的 Flax 接口)
https://flax.readthedocs.io/en/v0.8.3/experimental/nnx/index.html#
接下来,我们需要在__call__函数中对这些层进行组合:
classTransformerBlock(nnx.Module):
 def__call__(self, inputs, training:bool=False):
    input_shape = inputs.shape
    bs, seq_len, emb_sz = input_shape


    attention_output = self.mha(
      inputs_q=self.layer_norm1(inputs),
      mask=causal_attention_mask(seq_len),
      decode=False,
    )
    x = inputs + self.dropout1(
      attention_output, deterministic=nottraining
    )


   # MLP
    mlp_output = self.linear1(self.layer_norm2(x))
    mlp_output = nnx.gelu(mlp_output)
    mlp_output = self.linear2(mlp_output)
    mlp_output = self.dropout2(
      mlp_output, deterministic=nottraining
    )


   returnx + mlp_output
如果您使用过任何其他机器学习框架 (如 PyTorch 或 TensorFlow) 来训练语言模型,那么您对这段代码应该非常熟悉。但 JAX 具有通过SPMD(Single Program Multiple Data) 自动并行运行代码的强大能力。这项功能至关重要,因为我们将在多个加速器 (多个 TPU 核心) 上运行代码。让我们来看看它的工作原理。
SPMD
https://docs.jax.dev/en/latest/sharded-computation.html
要执行 SPMD,首先我们需要确保自己使用的是 TPU。如果您使用的是 Colab 或 Kaggle,请选择 TPU 运行时 (您也可以使用 Cloud TPU 虚拟机)。
import jax
jax.devices()


# Free-tier Colab offers TPU v2:
#[TpuDevice(id=0, process_index=0, coords=(0,0,0), core_on_chip=0),
# TpuDevice(id=1, process_index=0, coords=(0,0,0), core_on_chip=1),
# TpuDevice(id=2, process_index=0, coords=(1,0,0), core_on_chip=0),
# TpuDevice(id=3, process_index=0, coords=(1,0,0), core_on_chip=1),
# TpuDevice(id=4, process_index=0, coords=(0,1,0), core_on_chip=0),
# TpuDevice(id=5, process_index=0, coords=(0,1,0), core_on_chip=1),
# TpuDevice(id=6, process_index=0, coords=(1,1,0), core_on_chip=0),
# TpuDevice(id=7, process_index=0, coords=(1,1,0), core_on_chip=1)]
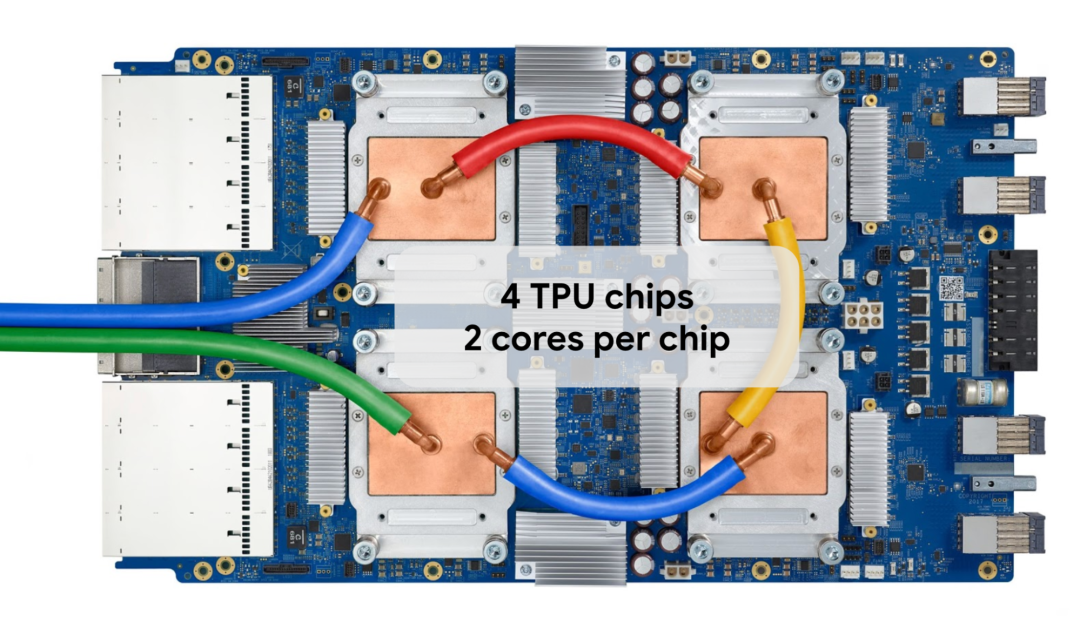
Colab 和 Kaggle 提供 TPU v2 或 v3,其中含有 8 个独立的 TPU 核心。TPU v3 托盘的外观如下所示:
训练您的 GPT-2 模型
为了高效训练 GPT-2 模型,我们将通过 SPMD 让所有 TPU 核心协同运行,并利用 JAX 中的数据并行。为此,我们定义了一个硬件网格:
mesh= jax.make_mesh((8,1), ('batch','model'))
数据并行
https://en.wikipedia.org/wiki/Data_parallelism
我们可以将网格视为加速器的 2D 矩阵。在本例中,我们为网格定义了两个轴:batch轴和model轴。因此,我们总共有 8 x 1 个核心,也就是 8 个核心。这些轴决定了我们如何划分数据和模型参数。如果之后想尝试其他并行方案,我们可以对这些轴进行调整。
现在,我们通过告诉 JAX 如何使用 "model" 轴划分模型参数来更改__init__函数。这是通过在初始化权重张量 (weight tensors) 时添加nnx.with_partitioning来实现的: 对于像 LayerNorm 缩放/偏置张量这样的 1D 权重张量 (weight tensors),我们直接沿着 "model" 轴对它们进行分片;对于像 MHA 和线性内核张量这样的 2D 权重张量,我们沿着model轴对第二维度进行分片。
classTransformerBlock(nnx.Module):
 def__init__(
    self,
    embed_dim:int,
    num_heads:int,
    ff_dim:int,
    dropout_rate:float,
    rngs: nnx.Rngs,
  ):
    self.layer_norm1 = nnx.LayerNorm(
      epsilon=1e-6, num_features=embed_dim,rngs=rngs, rngs=rngs,
      scale_init=nnx.with_partitioning(
        nnx.initializers.ones_init(),
        ("model"),
      ),
      bias_init=nnx.with_partitioning(
        nnx.initializers.zeros_init(),
       ("model"),
      ),
    )
    self.mha = nnx.MultiHeadAttention(
      num_heads=num_heads, in_features=embed_dim,
      kernel_init=nnx.with_partitioning(
        nnx.initializers.xavier_uniform(),
       (None,"model"),
      ),
      bias_init=nnx.with_partitioning(
        nnx.initializers.zeros_init(),
       ("model"),
      ),
    )
   # Other layers in the block are omitted for brevity
我们需要像这样划分其他层,以便为整个 GPT-2 模型启用模型张量并行。即使我们在本教程中不会使用模型张量并行,实现这一功能仍然是比较好的做法,因为随着模型规模的增长,我们将来可能需要对模型参数进行分区。实现后,我们只需更改一行代码即可立即运行更大的模型。例如:
mesh= jax.make_mesh((4,2), ('batch','model'))
接下来,我们需要定义loss_fn和train_step函数,与此前文章类似。train_step()函数会计算交叉熵损失函数的梯度,并通过优化器更新权重,然后在循环中被调用来训练模型。为了获得最佳性能,我们使用@nnx.jit装饰器对这两个函数进行 JIT 编译,因为它们属于计算密集型函数。
@nnx.jit
defloss_fn(model, batch):
  logits = model(batch[0])
  loss = optax.softmax_cross_entropy_with_integer_labels(
    logits=logits, labels=batch[1]
  ).mean()
 returnloss, logits


@nnx.jit
deftrain_step(
  model: nnx.Module,
  optimizer: nnx.Optimizer,
  metrics: nnx.MultiMetric,
  batch,
):
  grad_fn = nnx.value_and_grad(loss_fn, has_aux=True)
  (loss, logits), grads = grad_fn(model, batch)
  metrics.update(loss=loss, logits=logits, lables=batch[1])
  optimizer.update(grads)
此前文章
https://cloud.google.com/blog/products/ai-machine-learning/guide-to-jax-for-pytorch-developers
对于优化器,我们使用 Optax 中的 AdamW 以及余弦衰减调度。您也可以在 Optax 中试用其他优化器或调度计划。
schedule = optax.cosine_decay_schedule(
  init_value=init_learning_rate, decay_steps=max_steps
)
optax_chain = optax.chain(
  optax.adamw(learning_rate=schedule, weight_decay=weight_decay)
)
optimizer = nnx.Optimizer(model, optax_chain)
其他优化器
https://optax.readthedocs.io/en/latest/api/optimizers.html
调度计划
https://optax.readthedocs.io/en/latest/api/optimizer_schedules.html
最后,我们需要创建一个简单的训练循环。
while True:
  input_batch, target_batch =get_batch("train")


 train_step(
    model,
    optimizer,
    train_metrics,
    jax.device_put(
      (input_batch, target_batch),
     NamedSharding(mesh,P("batch", None)),
    ),
  )


  step +=1
  if step > max_steps:
    break
请注意我们使用jax.device_put函数沿着 batch 轴对输入数据进行分区。在这种情况下,JAX 将启用数据并行,并通过自动插入通信集合 (AllReduce) 将所有内容整合在一起,同时尽可能多地实现计算与通信的重叠。有关并行计算更深入的讨论,请参阅 JAX 的并行编程入门文档。
并行编程入门
https://docs.jax.dev/en/latest/notebooks/Distributed_arrays_and_automatic_parallelization.html#intro-and-a-quick-example
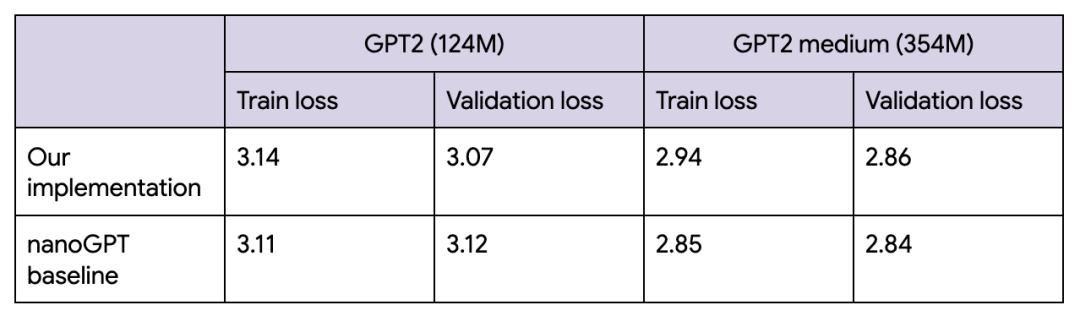
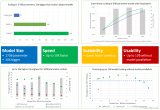
模型此时应处于训练状态,如果使用权重和偏差来跟踪运行情况,我们便可以观察训练损失。以下是训练 GPT-2 124M 模型的测试运行结果:

权重和偏差
https://wandb.ai/site
如果使用 Kaggle TPU v3,训练时间大约为 7 个小时 (我们可以不中断地使用 Kaggle TPU v3 9 个小时);但如果使用Trillium,训练时间将缩短至约 1.5 个小时 (请注意,Trillium 的每个芯片配备 32G 高带宽内存 (HBM),因此我们可以将批量大小加倍,并将训练步数减半)。
Trillium
https://cloud.google.com/blog/products/compute/trillium-tpu-is-ga
最终的损失情况与nanoGPT 的损失情况大致相符。我们在编写此代码示例时对 nanoGPT 进行了研究。
nanoGPT 的损失情况
https://github.com/karpathy/nanoGPT/tree/master?tab=readme-ov-file#baselines
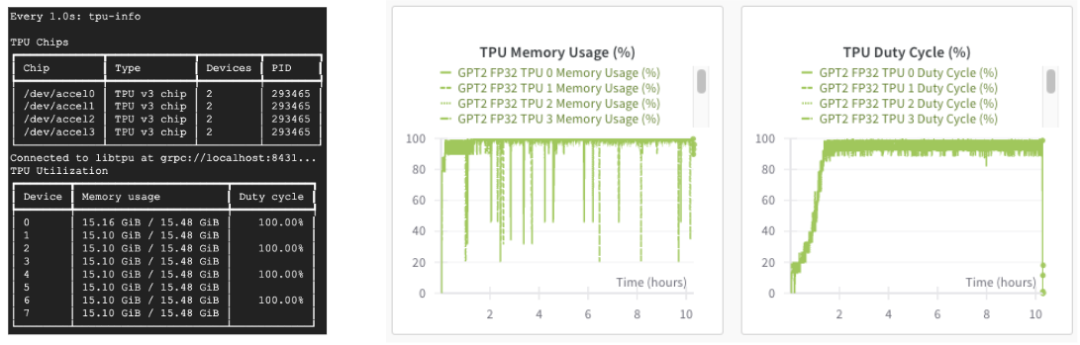
如果使用 Cloud TPU,我们还可以通过 "tpu-info" 命令 (Cloud TPU 监控调试包的一部分) 或权重和偏差仪表盘监控 TPU 利用率。我们的 TPU 正在全力运行!
Cloud TPU 监控调试
https://github.com/AI-Hypercomputer/cloud-tpu-monitoring-debugging
完成模型训练后,我们可以使用Orbax保存模型:
checkpointer = orbax.PyTreeCheckpointer()
train_state = nnx.pure(nnx.state(model))
checkpointer.save(checkpoint_path, train_state)
Orbax
https://github.com/google/orbax
后续步骤: 探索高级 LLM 训练和扩展
这基本上就是我们训练 GPT-2 模型所需了解的全部内容。您可以在完整的Notebook中找到其他详细信息,如数据加载、超参数、指标等。
Notebook
https://github.com/windmaple/LLM_from_scratch.JAX/tree/main/02.GPT2-pretraining
当然,GPT-2 如今还是一个小模型,许多前沿实验室正在训练拥有数千亿参数的模型。但是,现在您已经学习了如何使用 JAX 和 TPU 构建小语言模型,为深入了解如何扩展模型做好了准备。
如何扩展模型
https://jax-ml.github.io/scaling-book/
此外,您既可以使用MaxText来训练预构建的前沿 LLM,也可以通过参考JAX LLM 示例或Stanford Marin 模型来学习如何从头开始构建最新的模型。
MaxText
https://github.com/AI-Hypercomputer/maxtext
JAX LLM 示例
https://github.com/jax-ml/jax-llm-examples/
Stanford Marin 模型
https://developers.googleblog.com/en/stanfords-marin-foundation-model-first-fully-open-model-developed-using-jax/
我们期待看到您使用 JAX 和 TPU 构建的出色模型!
-
模型
+关注
关注
1文章
3573浏览量
50899 -
代码
+关注
关注
30文章
4913浏览量
71428 -
TPU
+关注
关注
0文章
156浏览量
21312 -
pytorch
+关注
关注
2文章
811浏览量
14166
原文标题:实战指南|手把手教您在 TPU 上免费使用 JAX 训练 GPT-2 模型
文章出处:【微信号:Google_Developers,微信公众号:谷歌开发者】欢迎添加关注!文章转载请注明出处。
发布评论请先 登录
用PaddleNLP在4060单卡上实践大模型预训练技术

如何利用Google Colab的云TPU加速Keras模型训练
OpenAI发布了一个“逆天”的AI模型——GPT2整个模型包含15亿个参数
OpenAI发布一款令人印象深刻的语言模型GPT-2
布朗大学90后研究生:我们复现了15亿参数GPT-2模型,你也行!
OpenAI宣布,发布了7.74亿参数GPT-2语言模型
和AI聊天,自然语言模型 GPT-2可能会推出个人信息
GPT系列的“高仿” 最大可达GPT-3大小 自主训练
使用NVIDIA TensorRT优化T5和GPT-2

基于OpenAI的GPT-2的语言模型ProtGPT2可生成新的蛋白质序列
GPT/GPT-2/GPT-3/InstructGPT进化之路
DeepSpeed里面和Zero相关技术教程
DeepSpeed结合Megatron-LM训练GPT2模型笔记
用PaddleNLP为GPT-2模型制作FineWeb二进制预训练数据集


 工商网监
工商网监
评论