 HarmonyOS应用图像stride处理方案

概述
在计算机图形学和图像处理中,stride通常指的是在内存中存储多维数组(如图像或纹理)时,行与行之间的字节间隔,即每一行的起始地址与下一行的起始地址之间的距离,在本文中stride指的是图像的一行数据在内存中实际占用的字节数,为了内存对齐和提高读取效率的要求,通常大于图像的宽度。在解析图像内容时,如果未考虑stride,直接通过使用width*height读取图像内容去解析图像,会导致相机预览异常;当预览流图像stride与width不一致时,需要对stride进行无效像素去除处理。
实现原理
当图像存储在内存中时,内存缓冲区可能在每行像素之后包含额外的填充字节。填充字节会影响图像在内存中的存储方式,但不会影响图像的显示方式。stride是内存中一行像素到内存中下一行像素的字节数;如果存在填充字节,则步幅比图像的宽度宽。
说明:stride在不同的平台底层上报的值不同,开发者需根据实际业务获取stride后做处理适配。在本文中通过预览流帧数据的返回值image.Component.rowStride获取stride。
如下图:在一个width为3,height为3,stride为4的图片上(例如定义了一个480*480分辨率的图像),实际分配内存并不是width*height即3*3(此处为定义的预览流分辨率的宽高比,即实际分配内存不是480*480),而是stride*height即4*3,这样实现了内存对齐,方便硬件处理。
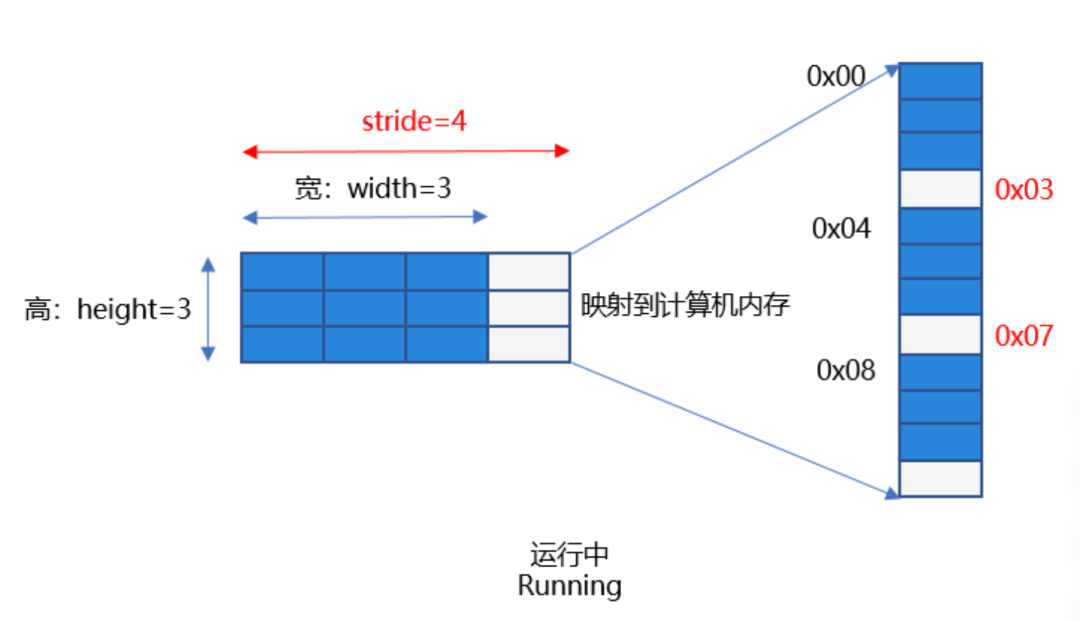
图1:需正确处理stride
如果开发者根据width和height数据去处理像素数据,即把0x00-0x09地址的数据当做像素去处理,就会出现解析了错误的像素数据的问题,并且使用了无效的像素0x03,0x07,会导致图片无法正常显示导致“相机花屏”现象。因此,要根据stride值处理预览数据流,去除无效的像素后送显,才能获取正确的预览流图像。
场景案例
以一种高频的用户使用场景为例,应用需要定义一个1080*1080分辨率的预览流图像,此时的stride在相关平台的返回值为1088,此时需要对stride进行处理,处理无效像素后解析出正确的像素数据,避免出现预览流花屏。
【反例】未处理stride:当开发者创建PixelMap解析buffer时,直接按照宽去读取每行数据,没有处理stride,此时若解析了无效像素数据并传给Image组件直接送显,可能会出现预览流花屏现象。
以下为部分示例代码:
1. 应用通过image.ImageReceiver注册imageArrival图像回调方法,获取每帧图像数据实例image.Image,应用通过定义一个width为1080*height为1080分辨率的预览流直接创建pixelMap,此时获取到的stride的值为1088,解析buffer时若直接按照宽去读取每行数据(使用了无效像素数据)并存储到全局变量stridePixel中,传给Image送显,会导致预览流花屏。
onImageArrival(receiver: image.ImageReceiver):void{
receiver.on('imageArrival',() =>{
  receiver.readNextImage((err: BusinessError, nextImage: image.Image) =>{
 if(err || nextImage ===undefined) {
   Logger.error(TAG,`requestPermissionsFromUser call Failed! error:${err.code}`);
   return;
  }
 if(nextImage) {
    nextImage.getComponent(image.ComponentType.JPEG,async(_err,component: image.Component) => {
   letwidth =1080;// width为应用创建预览流分辨率对应的宽
   letheight =1080;// height为应用创建预览流分辨率对应的高
   // component.byteBuffer为相机返回的预览流数据,其中包含了stride对齐数据
   letpixelMap =awaitimage.createPixelMap(component.byteBuffer, {
     size: {
     height: height,
     width: width
      },
     // 反例:width没有处理stride值,创建PixelMap解析buffer时直接按照宽去读取每行数据,可能使用了无效像素数据,导致预览流花屏。
     srcPixelFormat: image.PixelMapFormat.NV21
    })
   AppStorage.setOrCreate('stridePixel', pixelMap);// 将创建出的PixelMap存储到全局变量stridePixel中并传给Image组件送显。
    nextImage.release();
    })
  }
  });
})
}
2. 在初始相机模块时,调用onImageArrival(),将未处理的width和height作为size,创建PixelMap,通过在Image中传入被@StorageLink修饰的变量stridePixel进行数据刷新,图片送显。
@Component
exportstructPageThree{
pathStack:NavPathStack=newNavPathStack();
@StateisShowStridePixel:boolean=false;
@StorageLink('stridePixel')@Watch('onStridePixel')stridePixel: image.PixelMap|undefined=undefined;
@StateimageWidth:number=1080;
@StateimageHeight:number=1080;
@StorageLink('previewRotation')previewRotate:number=0;
onStridePixel():void{
 this.isShowStridePixel=true;
}
aboutToAppear():void{
 CameraService.initCamera(0);
}
aboutToDisappear():void{
 CameraService.releaseCamera();
}
// ...
build() {
 NavDestination() {
 // ...
 Column() {
   if(this.isShowStridePixel) {
   Image(this.stridePixel)// 反例:解析了错误的像素数据,并存储到全局变量stridePixel中,传给Image送显,会导致相机预览流花屏。
      .width(px2vp(this.imageWidth))
      .height(px2vp(this.imageHeight))
      .margin({top:150})
      .rotate({
     z:0.5,
     angle:this.previewRotate
      })
    }
   // ...
  }
  .justifyContent(FlexAlign.Center)
  .height('90%')
  .width('100%')
  }
  .backgroundColor(Color.White)
  .hideTitleBar(true)
  .onBackPressed(() =>{
 this.pathStack.pop();
 returntrue;
  })
  .onReady((context: NavDestinationContext) =>{
 this.pathStack= context.pathStack;
  })
}
}
【正例一】开发者使用width,height,stride三个值,处理相机预览流数据,处理stride方法一如下。分两种情况:
1. 当stride和width相等时,按宽读取buffer不影响结果。
2. 当stride和width不等时,将相机返回的预览流数据即component.byteBuffer的数据去除stride,拷贝得到新的dstArr数据进行数据处理,将处理后的dstArr数组buffer,通过width和height直接创建pixelMap, 并存储到全局变量stridePixel中,传给Image送显。
onImageArrival(receiver: image.ImageReceiver):void{
receiver.on('imageArrival',() =>{
  receiver.readNextImage((err: BusinessError, nextImage: image.Image) =>{
 // ...
 if(nextImage) {
    nextImage.getComponent(image.ComponentType.JPEG,
   async(err,component: image.Component) => {
     letwidth =1080;// width为应用创建预览流分辨率对应的宽
     letheight =1080;// height为应用创建预览流分辨率对应的高
     letstride = component.rowStride;// 通过component.rowStride获取stride
     // 正例:情况1. 当图片的width等于相机预览流返回的行跨距stride,此时无需处理stride,通过width和height直接创建pixelMap,
     // 并存储到全局变量stridePixel中,传给Image送显。
     if(stride === width) {
     letpixelMap =awaitimage.createPixelMap(component.byteBuffer, {
       size: {height: height,width: width },
       srcPixelFormat: image.PixelMapFormat.NV21,
      })
     AppStorage.setOrCreate('stridePixel', pixelMap);
      }else{
     // 正例:情况2. 当图片的width不等于相机预览流返回的行跨距stride,
     // 此时将相机返回的预览流数据component.byteBuffer去除掉stride,拷贝得到新的dstArr数据,数据处理后传给其他不支持stride的接口处理。
     constdstBufferSize = width * height *1.5;// 创建一个width * height * 1.5的dstBufferSize空间,此处为NV21数据格式。
     constdstArr =newUint8Array(dstBufferSize);// 存放去掉stride后的buffer。
     // 读取每行数据,相机支持的profile宽高均为偶数,不涉及取整问题。
     for(letj =0; j < height *?1.5; j++) {?// 循环dstArr的每一行数据。
? ? ? ? ? ? ? ??// 拷贝component.byteBuffer的每行数据前width个字节到dstArr中(去除无效像素,刚好每行得到一个width*height的八字节数组空间)。
? ? ? ? ? ? ? ??const?srcBuf =?new?Uint8Array(component.byteBuffer, j * stride,
? ? ? ? ? ? ? ? width);?// 将component.byteBuffer返回的buffer,每行遍历,从首位开始,每行截取出width字节。
? ? ? ? ? ? ? ? dstArr.set(srcBuf, j * width);?// 将width*height大小的数据存储到dstArr中。
? ? ? ? ? ? }
? ? ? ? ? ??let?pixelMap =?await?image.createPixelMap(dstArr.buffer, {
? ? ? ? ? ? ? ??// 将处理后的dstArr数组buffer,通过width和height直接创建pixelMap,并存储到全局变量stridePixel中,传给Image送显。
? ? ? ? ? ? ? ??size: {?height: height,?width: width },
? ? ? ? ? ? ? ??srcPixelFormat: image.PixelMapFormat.NV21,
? ? ? ? ? ? })
? ? ? ? ? ??AppStorage.setOrCreate('stridePixel', pixelMap);
? ? ? ? ? ? }
? ? ? ? ? ? nextImage.release();
? ? ? ? })
? ? }
? ? });
})
}
【正例二】开发者使用width,height,stride三个值,处理相机预览流数据,处理stride方法二如下。分两种情况:
1. 当stride和width相等时,与正例一情况一致,此处不再赘述。
2. 当stride和width不等时,如果应用想使用byteBuffer预览流数据创建pixelMap直接显示,可以根据stride*height字节的大小先创建pixelMap,然后调用PixelMap的cropSync方法裁剪掉多余的像素,从而正确处理stride,解决预览流花屏问题。
onImageArrival(receiver: image.ImageReceiver):void{
receiver.on('imageArrival',() =>{
  receiver.readNextImage((err: BusinessError, nextImage: image.Image) =>{
 // ...
 if(nextImage) {
    nextImage.getComponent(image.ComponentType.JPEG,async(_err,component: image.Component) => {
   letwidth =1080;// width为应用创建预览流分辨率对应的宽
   letheight =1080;// height为应用创建预览流分辨率对应的高
   letstride = component.rowStride;// 通过component.rowStride获取stride
   Logger.info(TAG,`receiver getComponent width:${width}height:${height}stride:${stride}`);
   // stride和width相等,按宽读取buffer不影响结果
   if(stride === width) {
     letpixelMap =awaitimage.createPixelMap(component.byteBuffer, {
     size: {height: height,width: width },
     srcPixelFormat: image.PixelMapFormat.NV21,
      })
     AppStorage.setOrCreate('stridePixel', pixelMap);
    }else{
     letpixelMap =awaitimage.createPixelMap(component.byteBuffer, {
     // 正例:1、创建PixelMap时width传stride,
     size: {height: height,width: stride },
     srcPixelFormat:8,
      })
     // 2、然后调用PixelMap的cropSync方法裁剪掉多余的像素。
      pixelMap.cropSync({
     size: {width: width,height: height },
     x:0,
     y:0
      })// 根据输入的尺寸裁剪图片,从(0,0)开始,裁剪width*height字节的区域。
     letpixelBefore:PixelMap|undefined=AppStorage.get('stridePixel');
     awaitpixelBefore?.release();
     AppStorage.setOrCreate('stridePixel', pixelMap);
    }
    nextImage.release();
    })
  }
  });
})
}
常见问题
如何获取相机预览流帧数据
通过ImageReceiver中imageArrival事件监听获取底层返回的图像数据。
如何获取预览流图像的stride的值
可以通过预览流帧数据的返回值image.Component.rowStride获取stride。
-
计算机
+关注
关注
19文章
7679浏览量
90987 -
内存
+关注
关注
8文章
3128浏览量
75361 -
图像
+关注
关注
2文章
1094浏览量
41488 -
HarmonyOS
+关注
关注
80文章
2128浏览量
33399
原文标题:HarmonyOS应用图像stride处理方案
文章出处:【微信号:HarmonyOS_Dev,微信公众号:HarmonyOS开发者】欢迎添加关注!文章转载请注明出处。
发布评论请先 登录
《DNK210使用指南 -CanMV版 V1.0》第三十五章 image图像特征检测实验
ADAS方案设计成功关键:图像处理技术
如何使用Stride模式?
Altera的视频和图像处理解决方案


HarmonyOS的组件化设计方案
HarmonyOS测试技术与实战-分布式应用测试解决方案


 工商网监
工商网监
评论